MLflow⚓︎
Links to external documentation
MLflow is a platform to streamline machine learning development, including experiment tracking, model registry, and model deployment. prokube provides a centralized MLflow instance with OIDC authentication and multi-user support.
Architecture⚓︎
prokube's MLflow setup consists of:
- MLflow Server: Centralized tracking server with OIDC authentication
- PostgreSQL: Backend store for metadata
- MinIO: Artifact storage for models and files
- mlflow-oidc-auth: Plugin providing multi-user support and permissions
Admin Access and User Management⚓︎
As an admin user, you have full visibility and control over all MLflow resources:
- View all users' experiments, runs, and models
- Manage permissions for any resource
- Create and manage service accounts
- Configure group-based access
Accessing the Permissions Management UI⚓︎
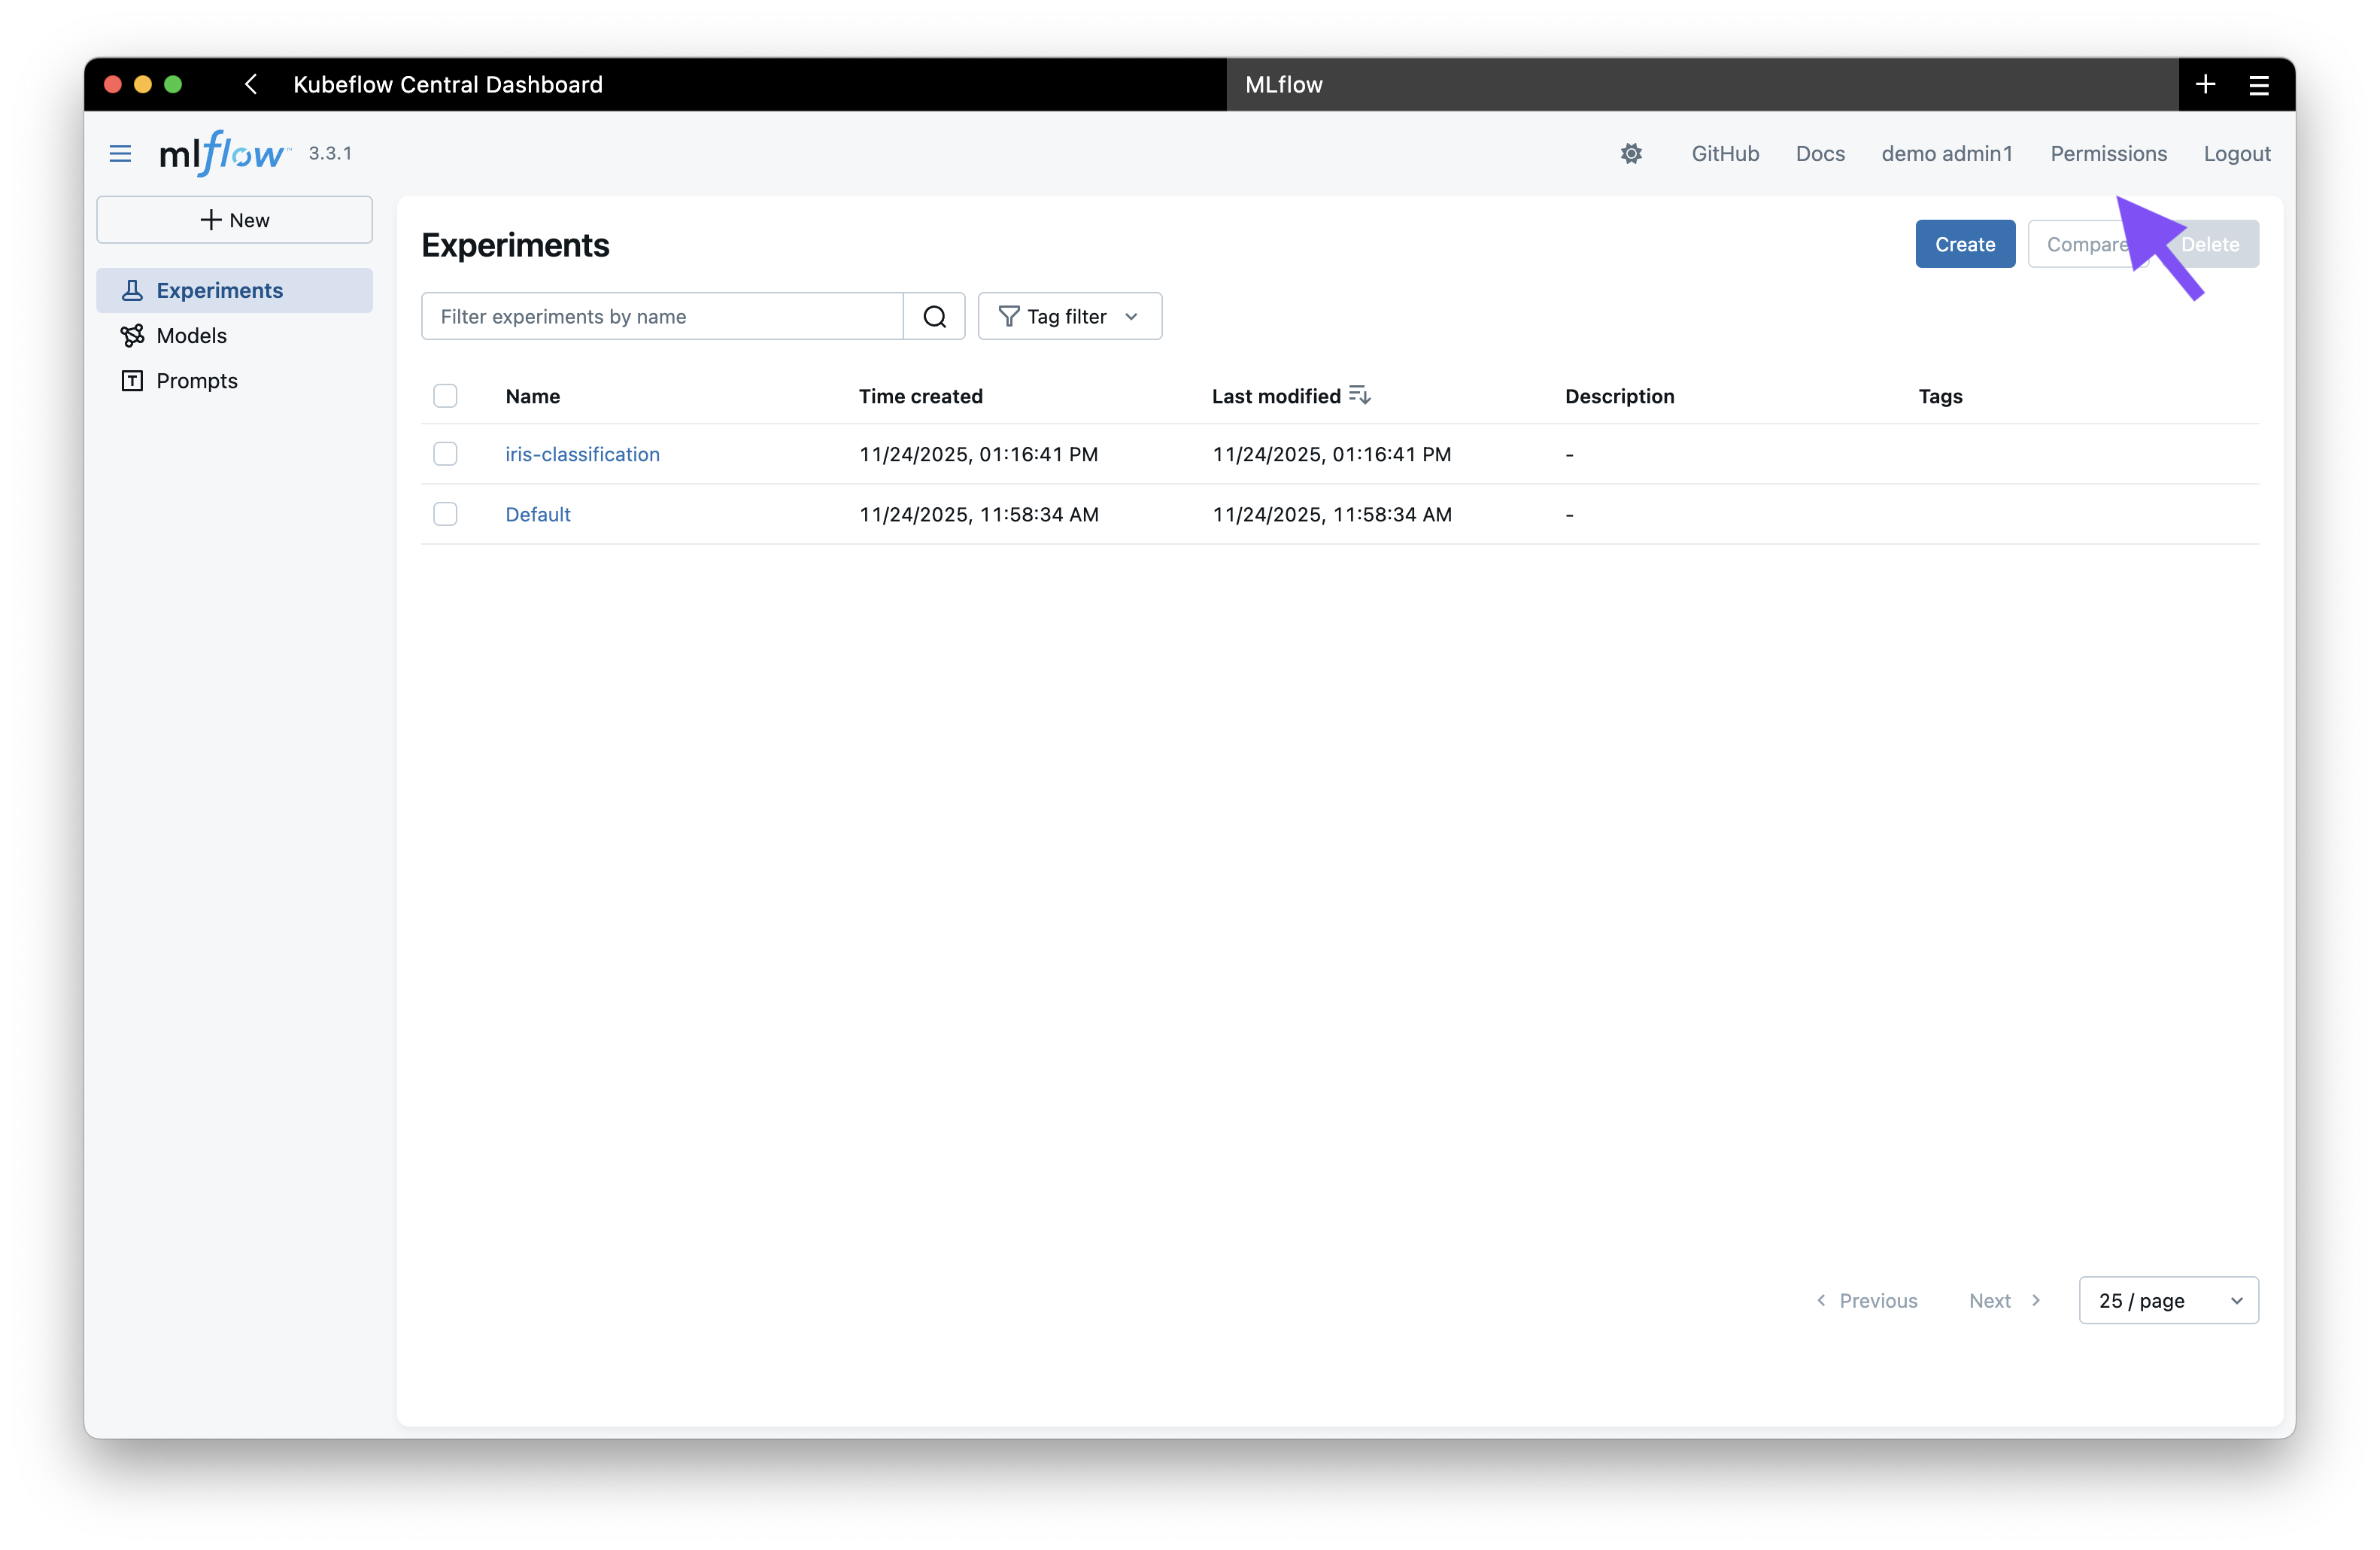
When you log in to MLflow as an admin user via Keycloak, you initially see the standard MLflow interface. To access the permissions management:
- Click on the "Permissions" tab in the top right corner
- This takes you to the OIDC plugin's permission management interface
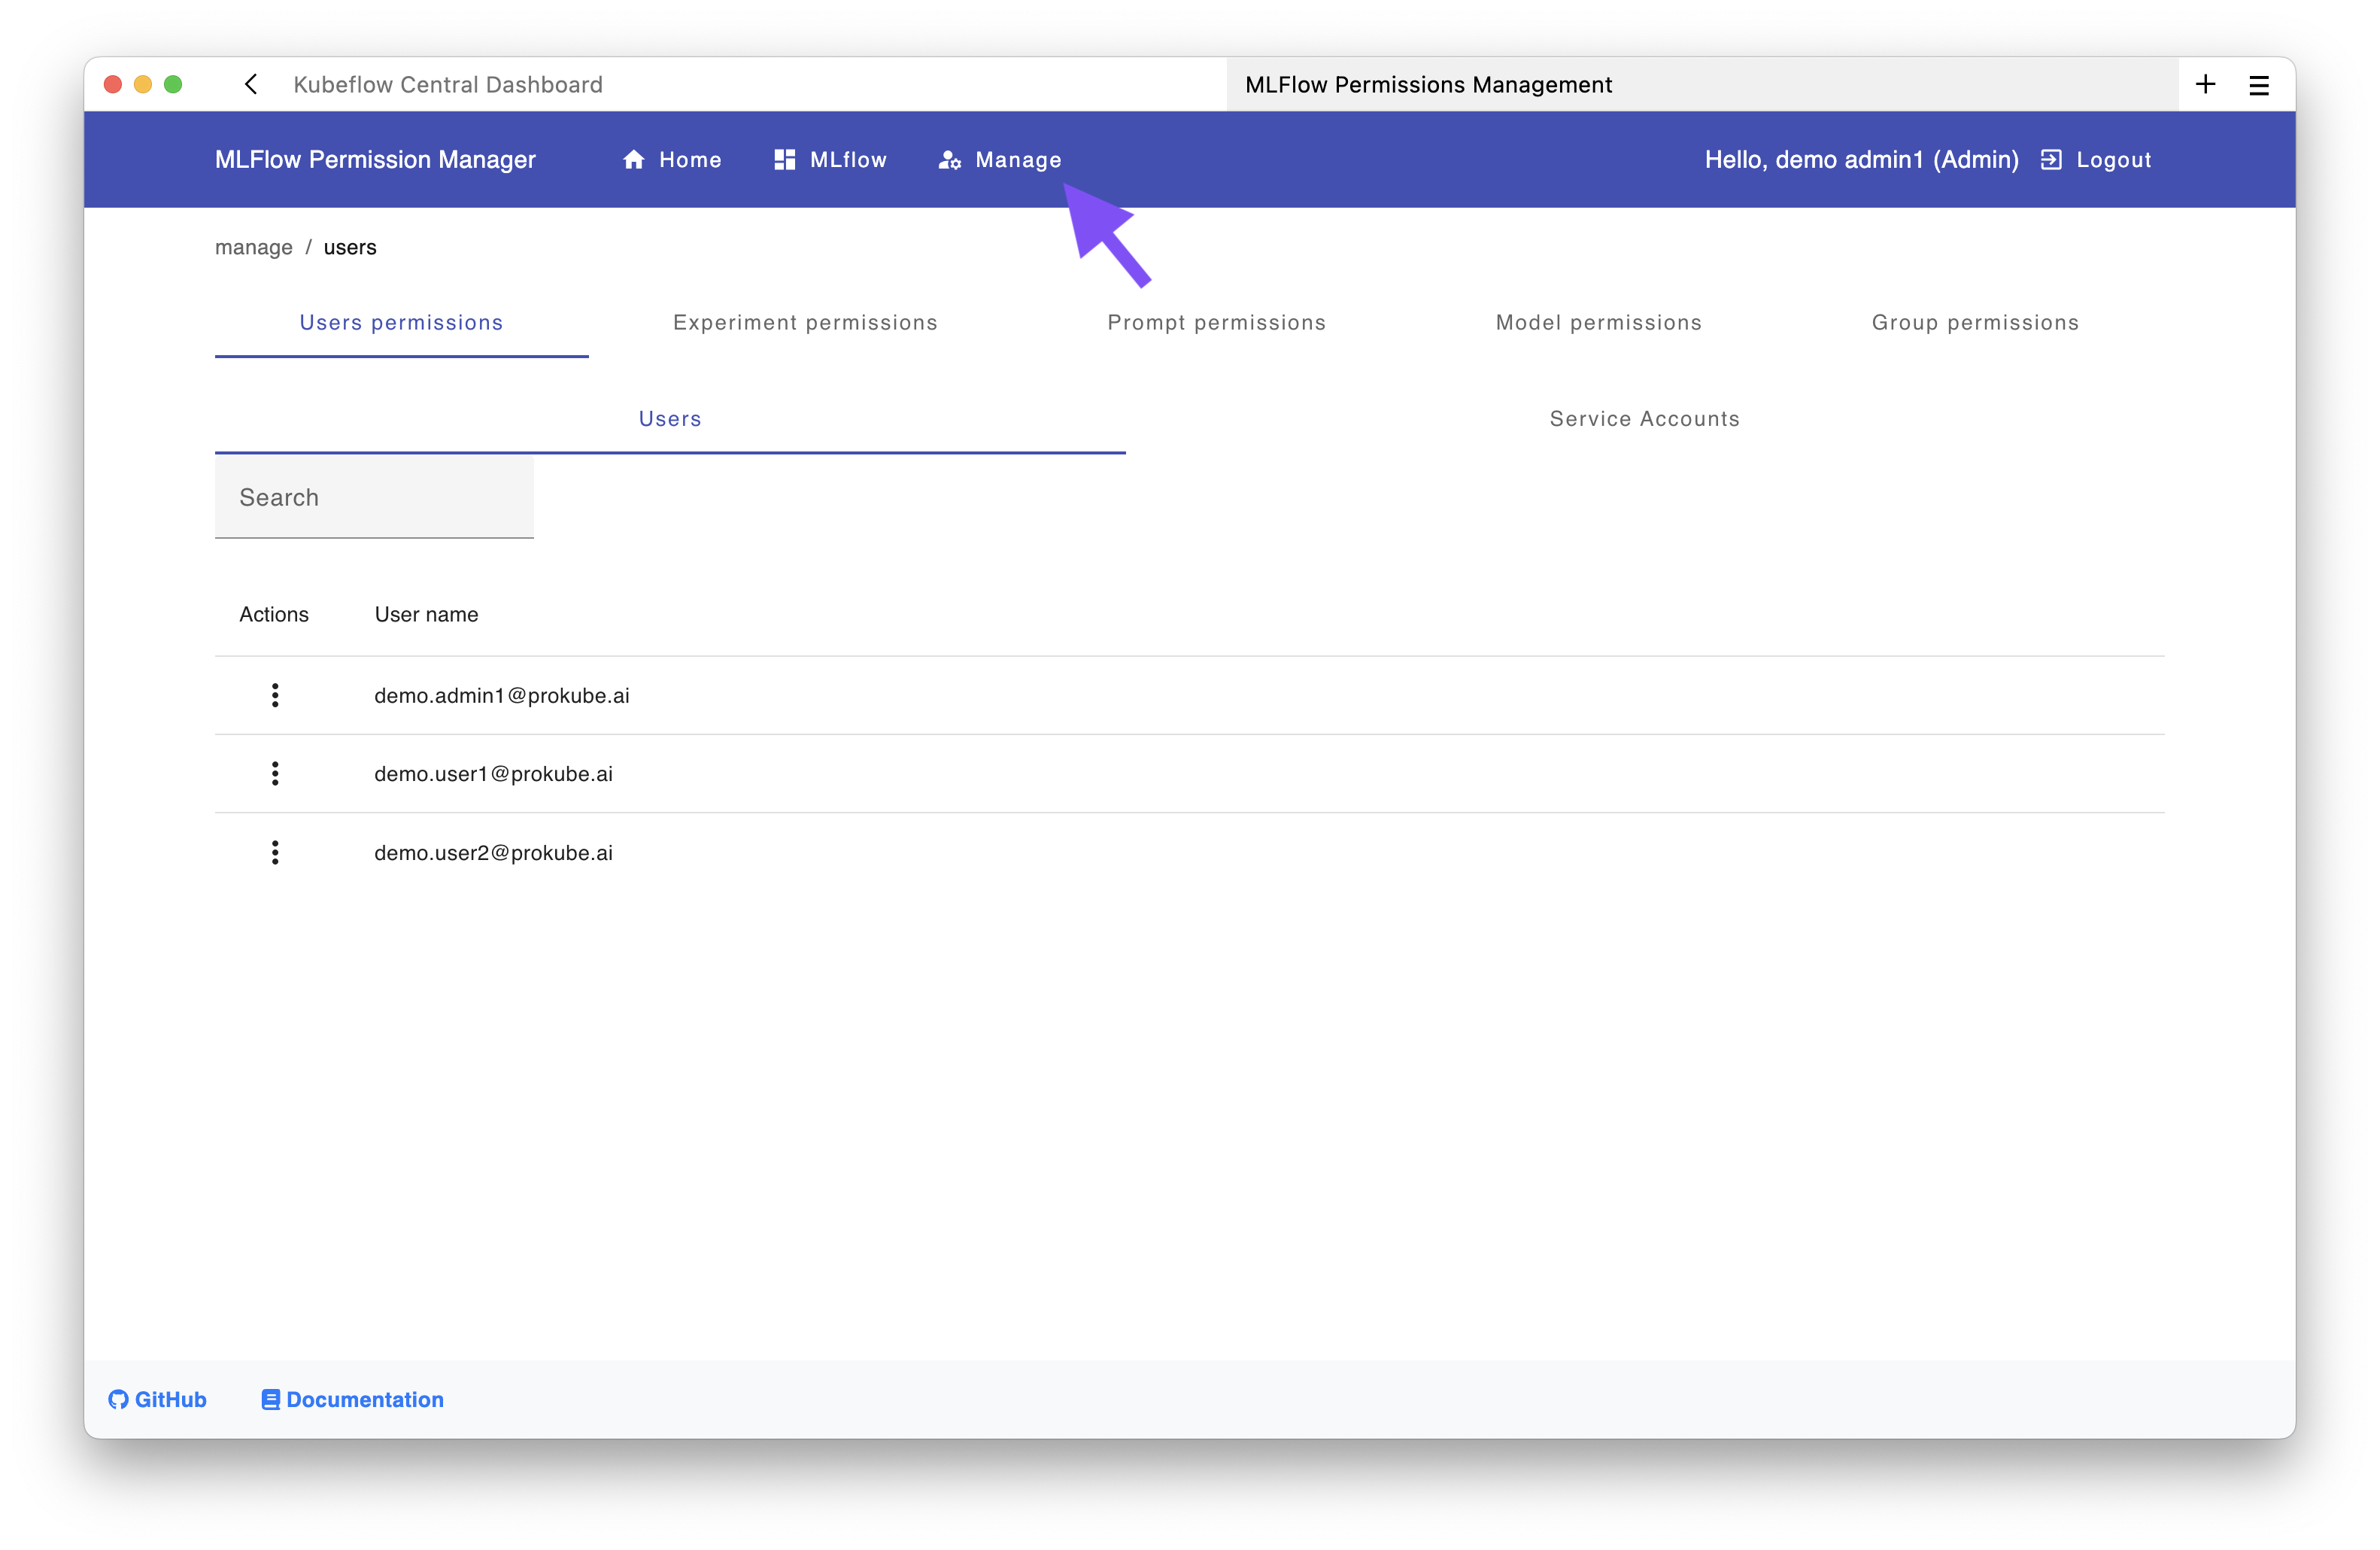
From this interface, you can click the "Manage" button to access the permission management UI where you can:
- Manage permissions for experiments, models, and prompts
- Grant permissions at different levels: EDIT, READ, MANAGE, or NO_PERMISSIONS
- Assign permissions to individual users, groups, or service accounts
Using the API (Optional)⚓︎
For automation and scripting, you can use the MLflow OIDC API instead of the UI.
Generate a Personal Access Token:
- Navigate to the Permissions page in the MLflow UI
- Click "Create access key"
- Copy and save the token securely
Example API Usage:
# List all users
curl -X GET https://<domain>/mlflow/api/2.0/mlflow/permissions/users \
  -u "admin@example.com:your-pat-token"
Upstream Documentation:
Team Collaboration Setup⚓︎
When following the steps described in the IAM User Management guide to create a shared workspace for teams, the corresponding group is automatically created in MLflow. However, shared experiments and models, as well as the associated service account, must be created separately.
This example demonstrates the setup for:
- Keycloak role:
pk:ds-team-alpha(created in Keycloak, see IAM docs) - Experiment name:
ds-team-alpha-exp1 - Service account:
svc-ds-team-alpha
All of the following steps can be performed either in the management UI or using the API.
Step 1: Create a Shared Resource⚓︎
If the experiment, model, or prompt doesn't exist yet, you need to create it first.
Using the UI:
Create the experiment through the MLflow interface:

Using the API:
curl -X POST "https://<your-domain>/mlflow/api/2.0/mlflow/experiments/create" \
  -u "admin@example.com:<your-admin-pat>" \
  -H "Content-Type: application/json" \
  -d '{"name": "ds-team-alpha-exp1"}'
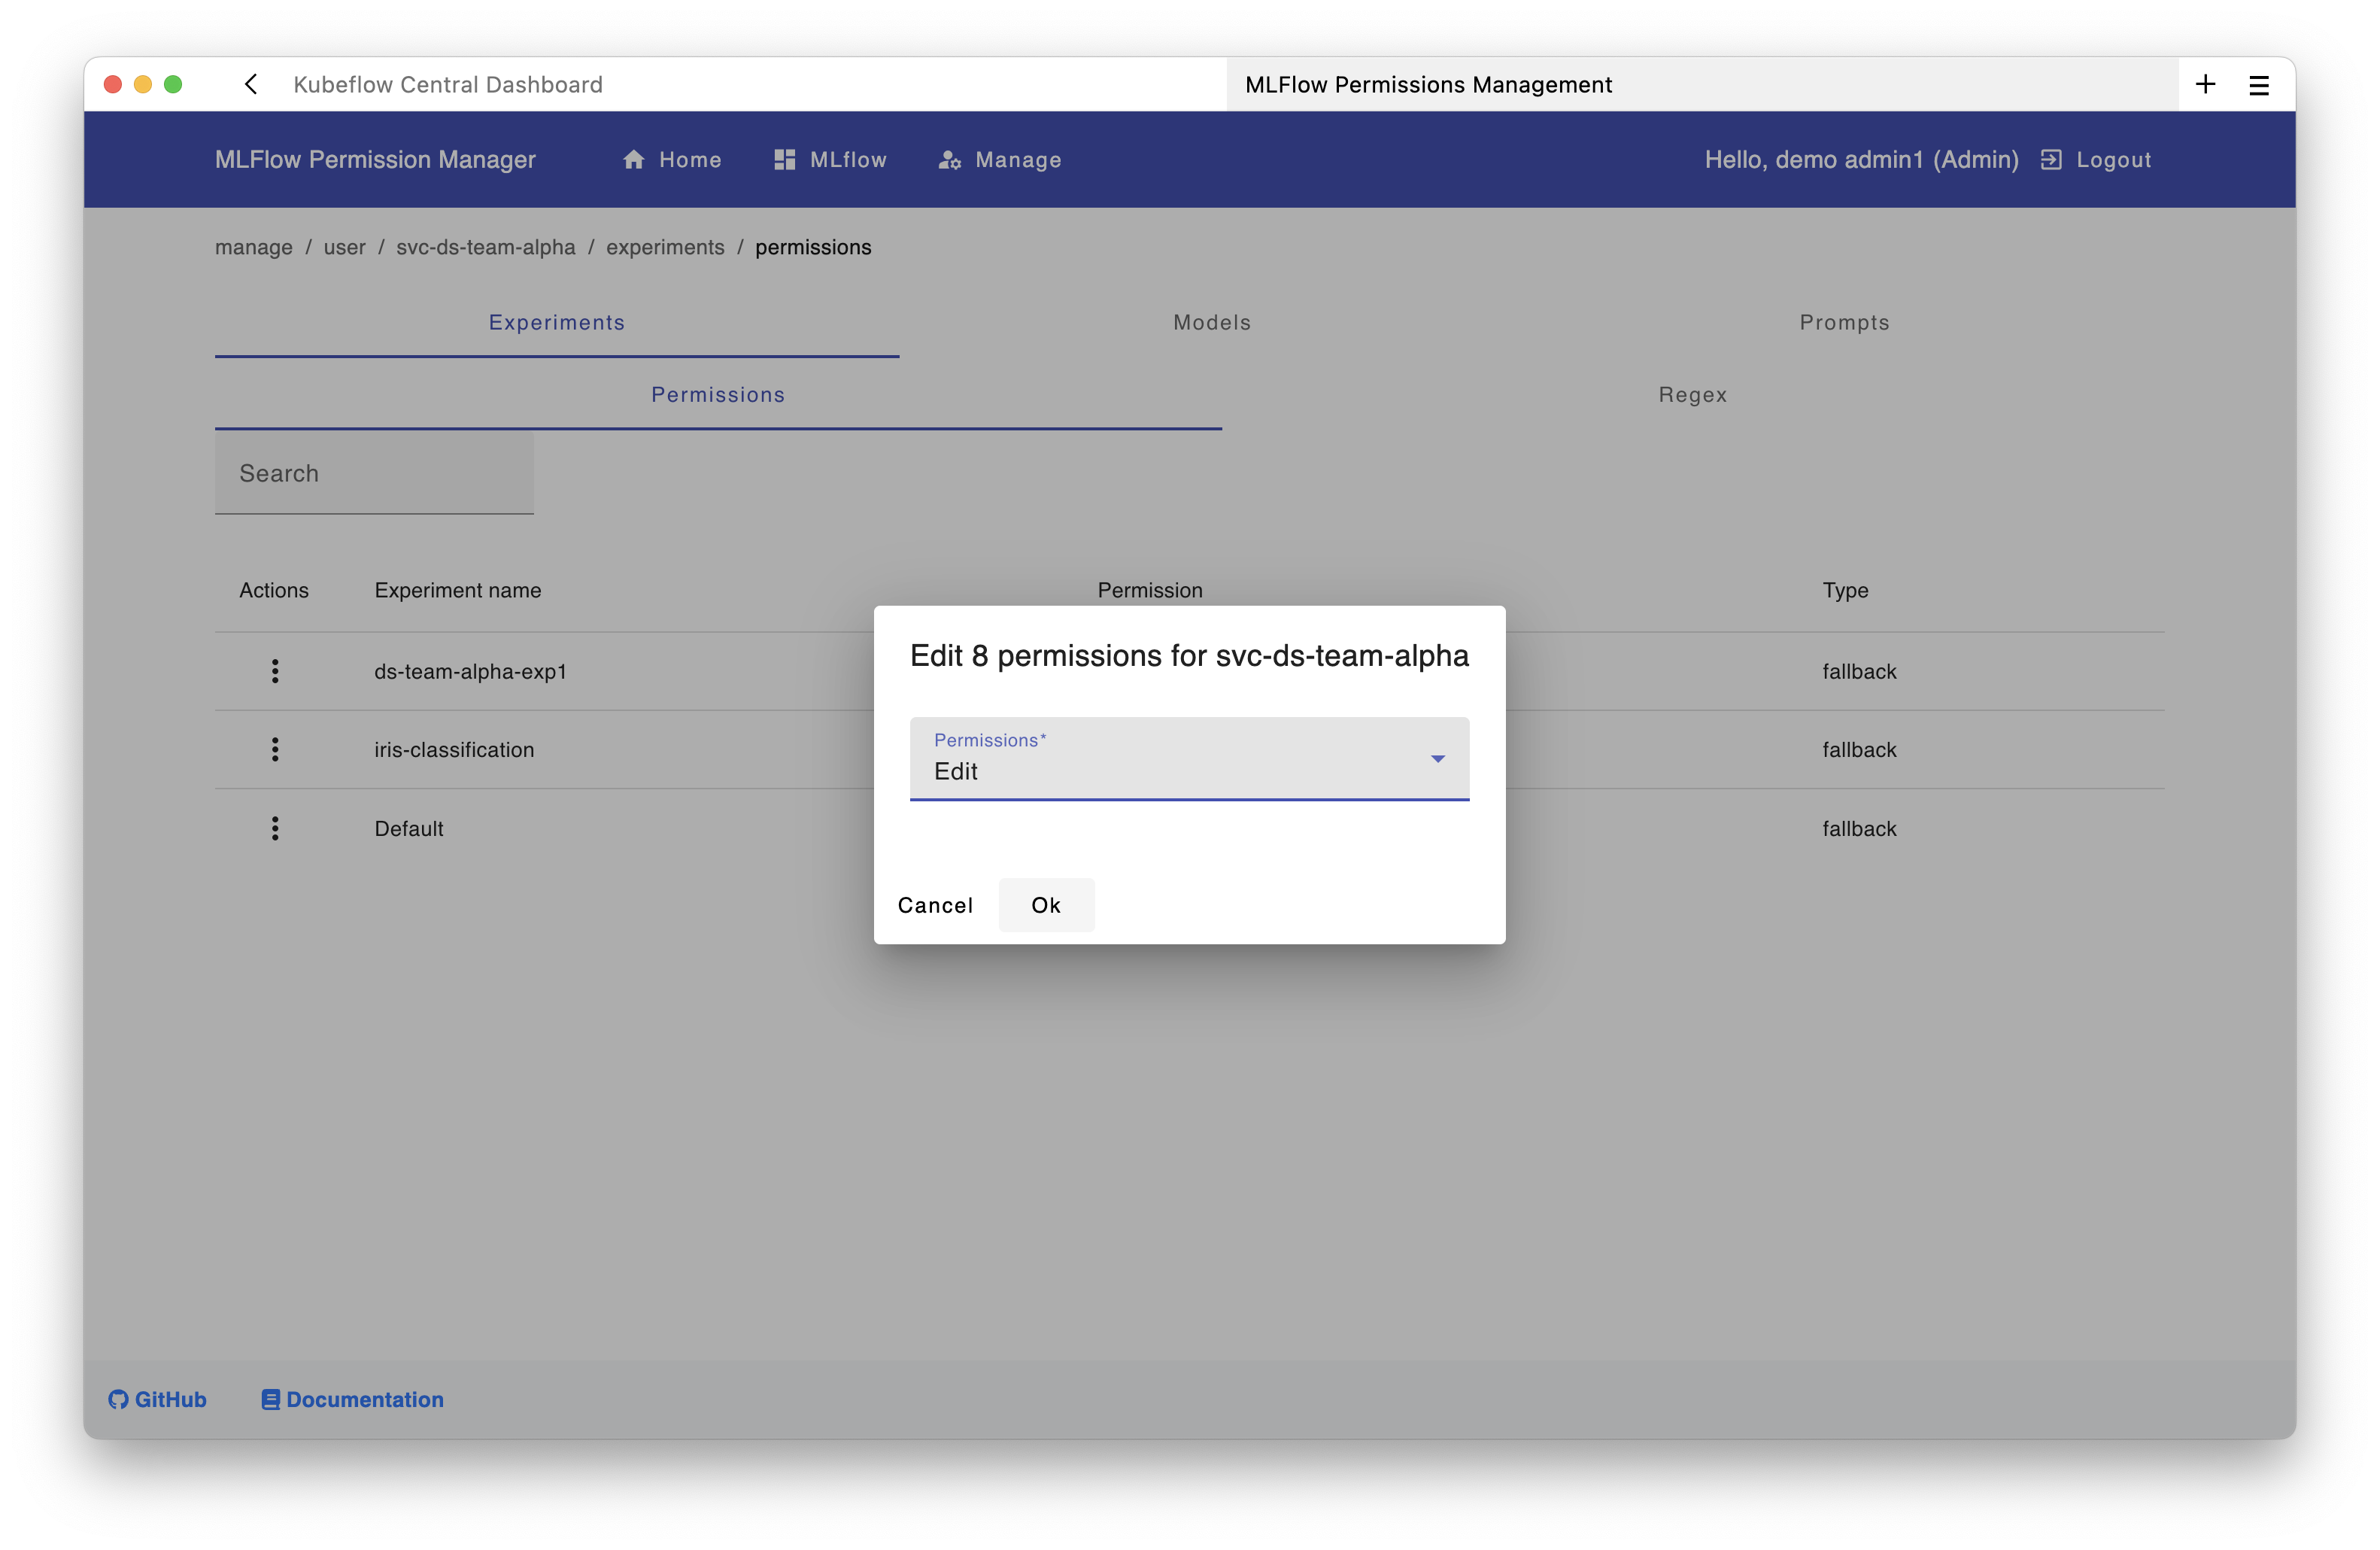
Step 2: Grant Permissions to the Team Group⚓︎
Now grant the team group access to the experiment.
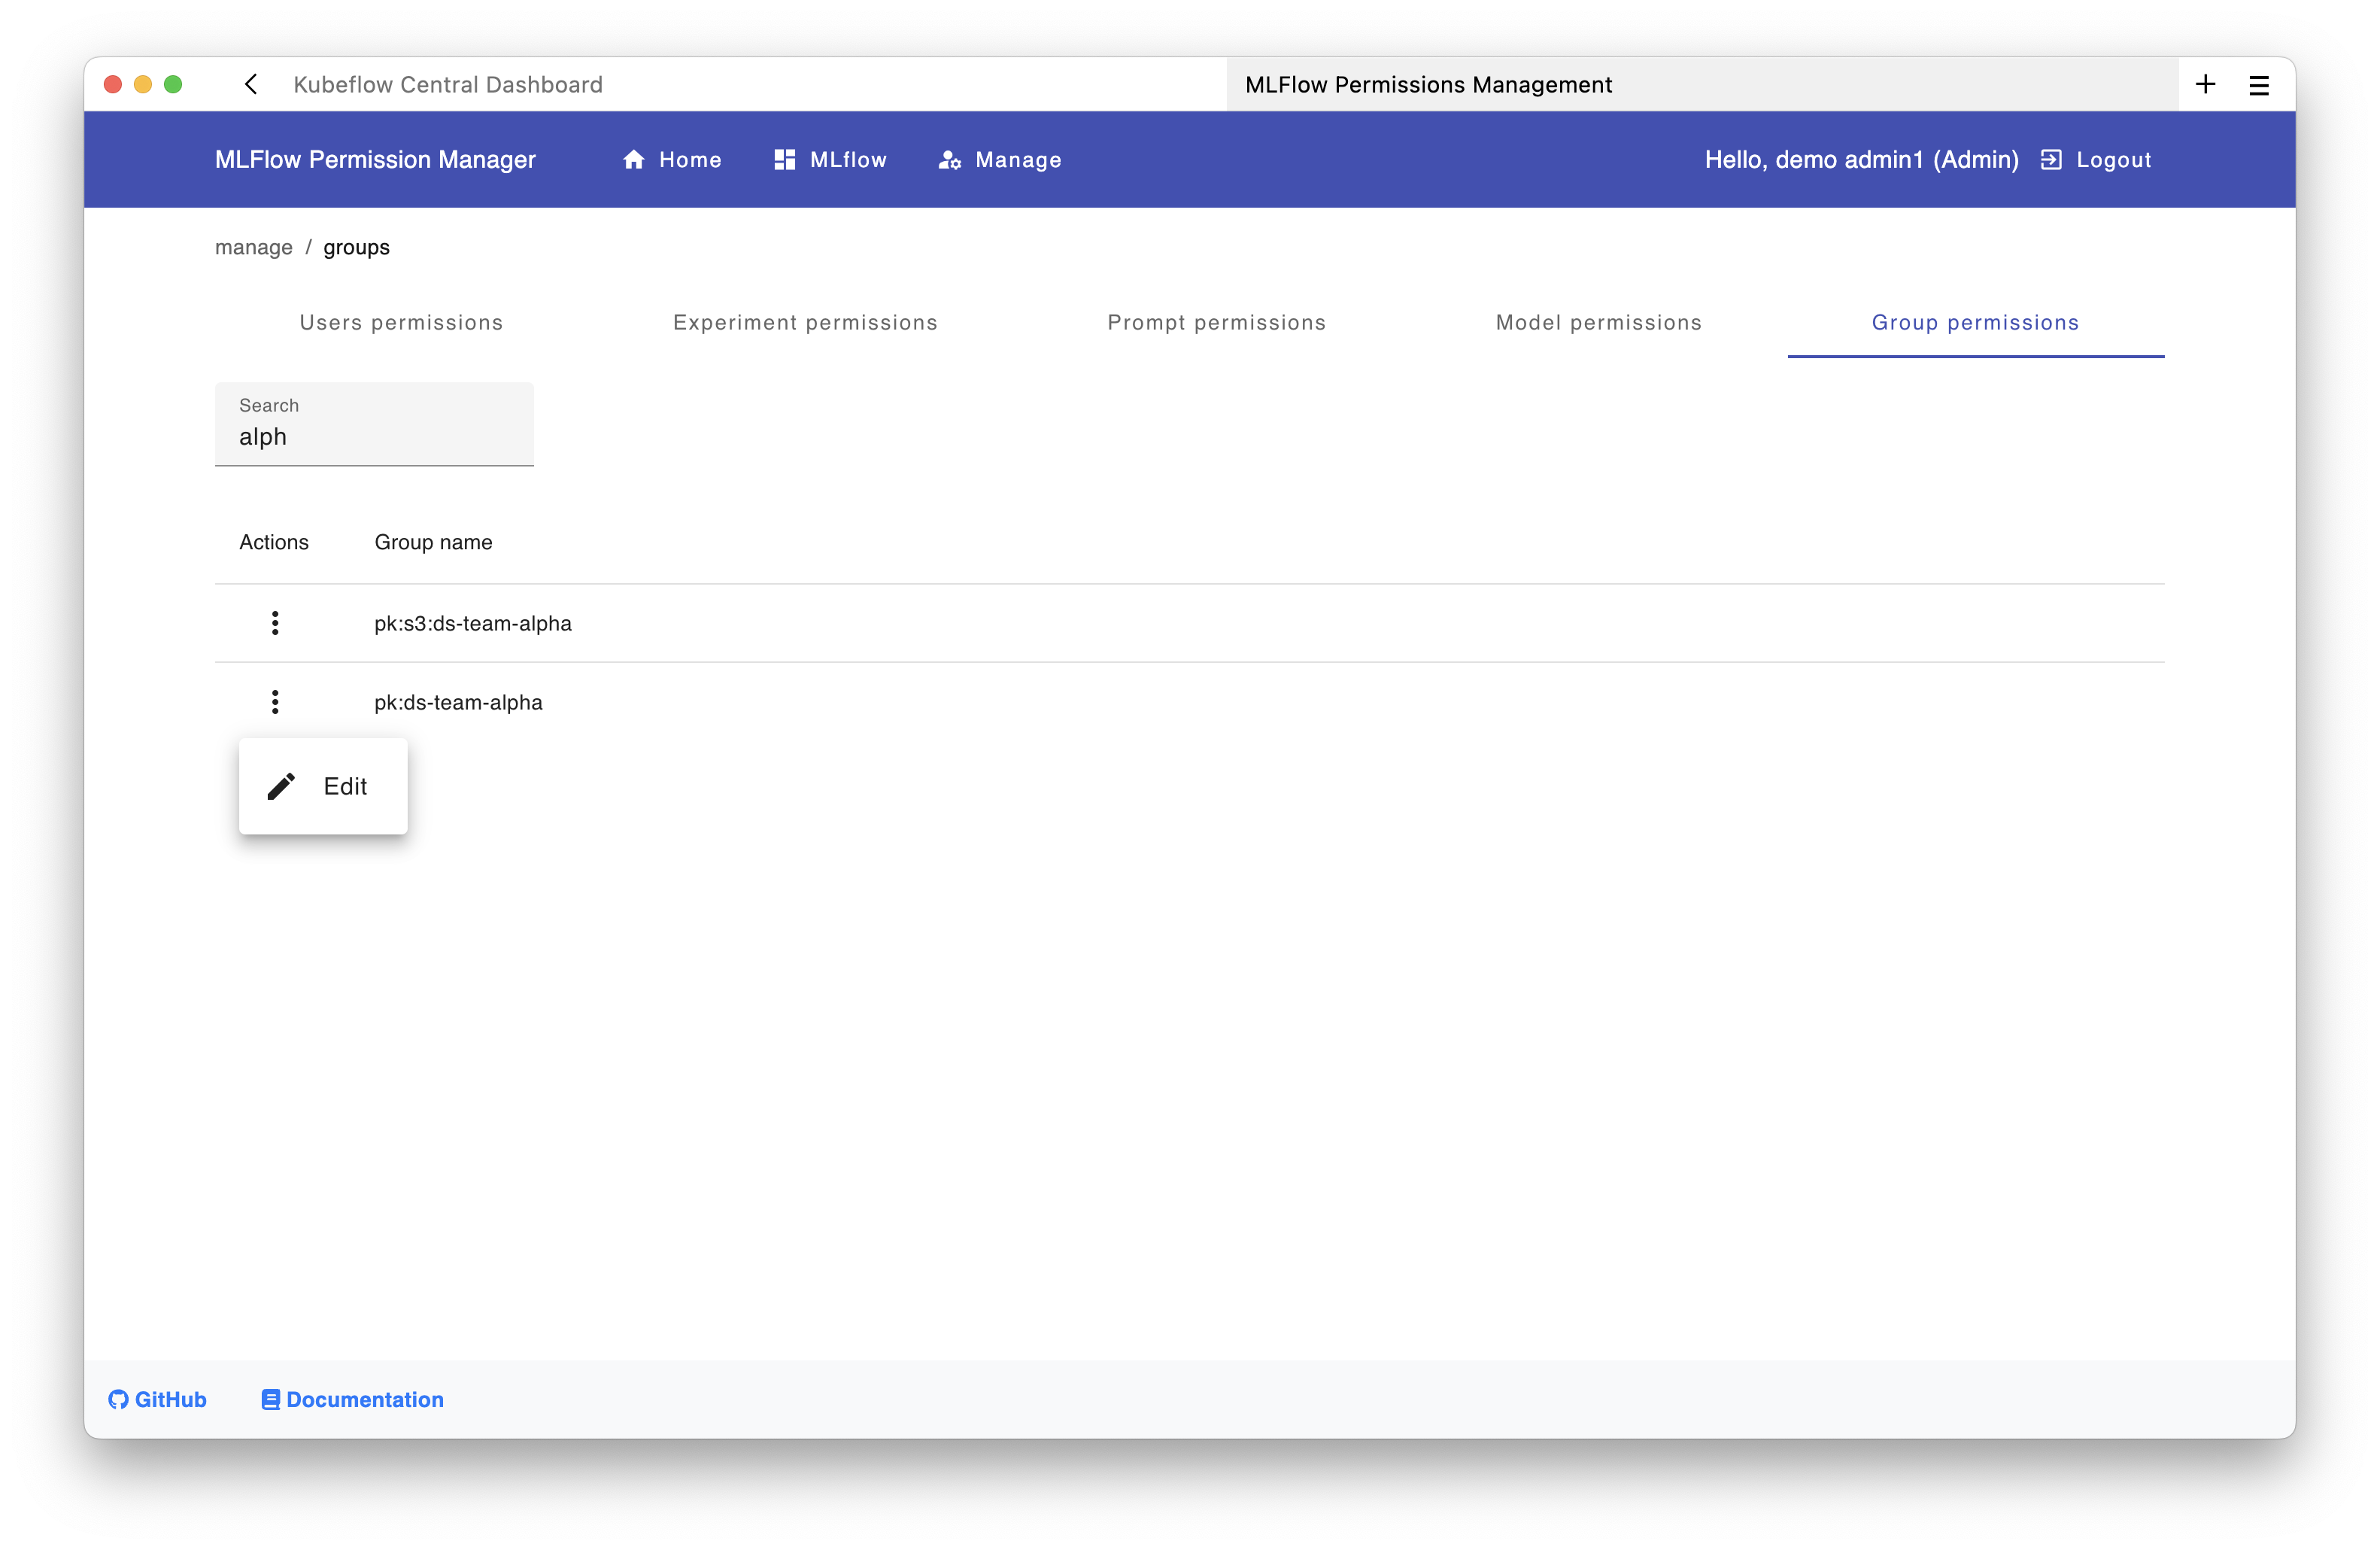
Using the UI:
- In the management UI, click on "Group Permissions"
- Search for "alpha" to find the group
pk:ds-team-alpha - Click the "Edit" button (three dots menu)
In the new window:
- Navigate to the Experiments tab and click "Add"
- Select the experiment
ds-team-alpha-exp1 - Choose the permission level (e.g.,
EDIT)
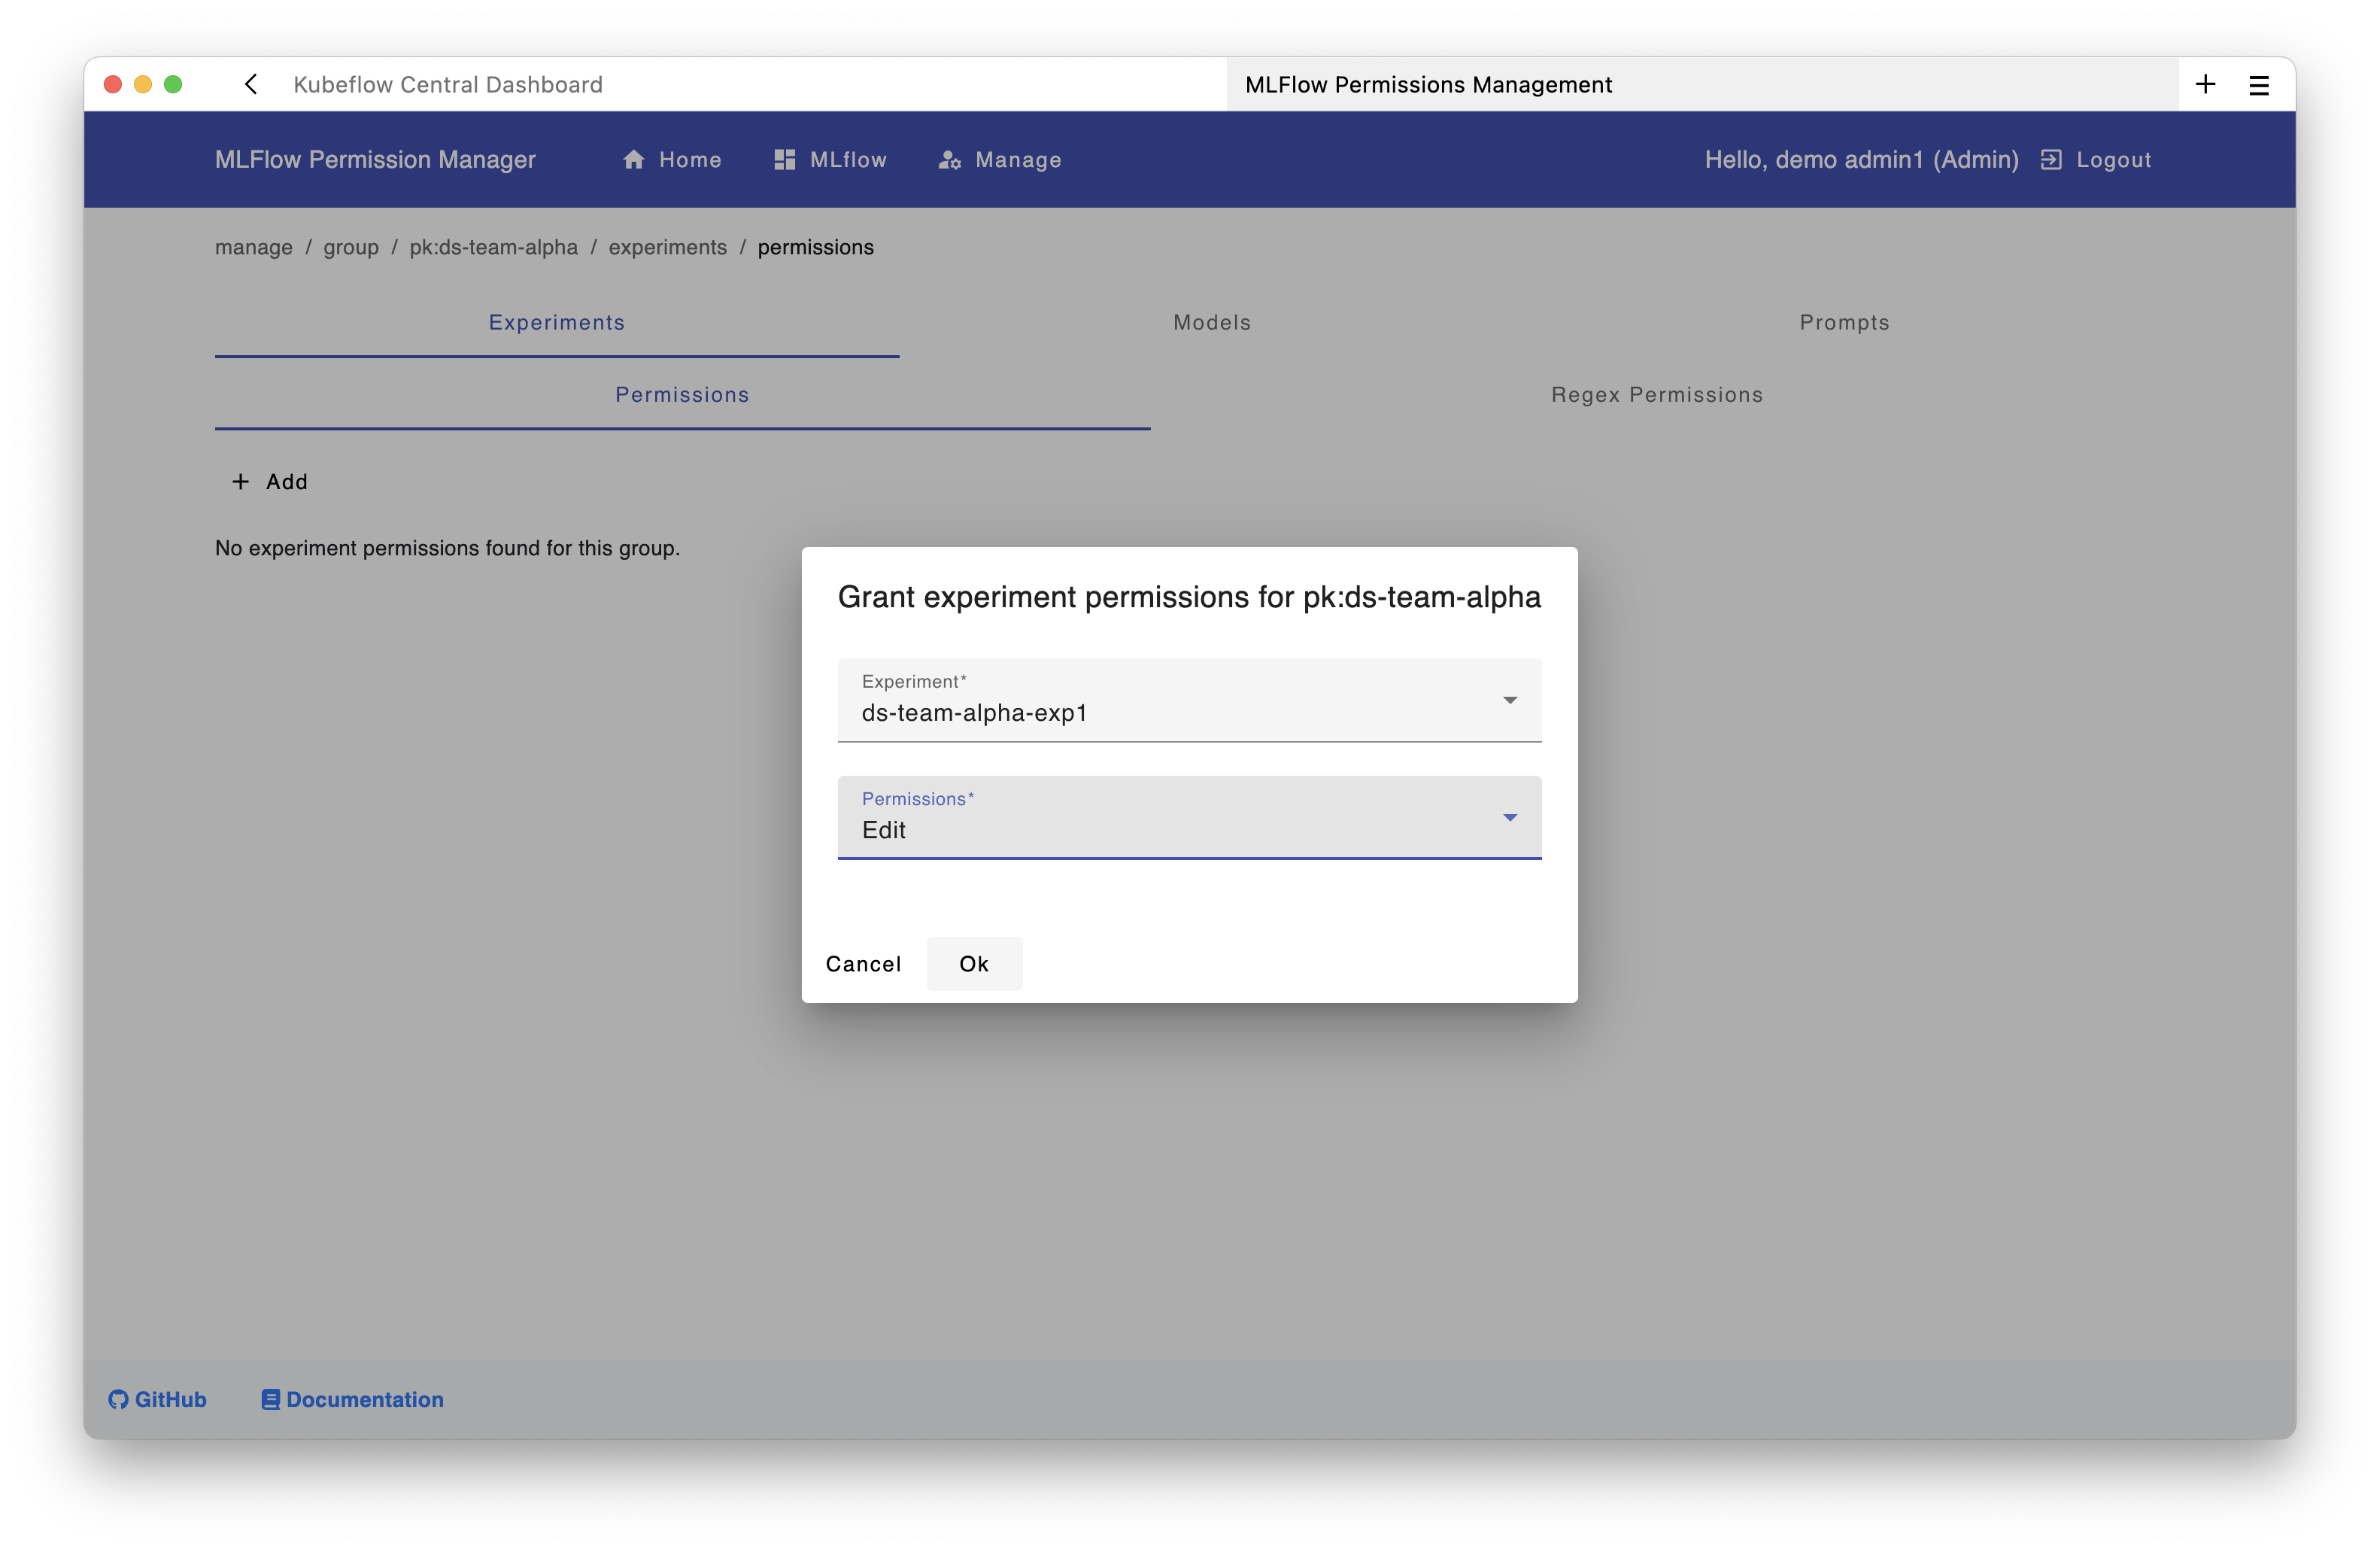
All users in the group pk:ds-team-alpha now have access to the experiment ds-team-alpha-exp1. The same process can be applied to models and prompts.
Using the API:
curl -X POST "https://<your-domain>/mlflow/api/2.0/mlflow/permissions/groups/pk:ds-team-alpha/experiments/<experiment-id>" \
  -u "admin@example.com:<your-admin-pat>" \
  -H "Content-Type: application/json" \
  -d '{"permission": "EDIT"}' # depending on the use case, "READ" might also be an option here
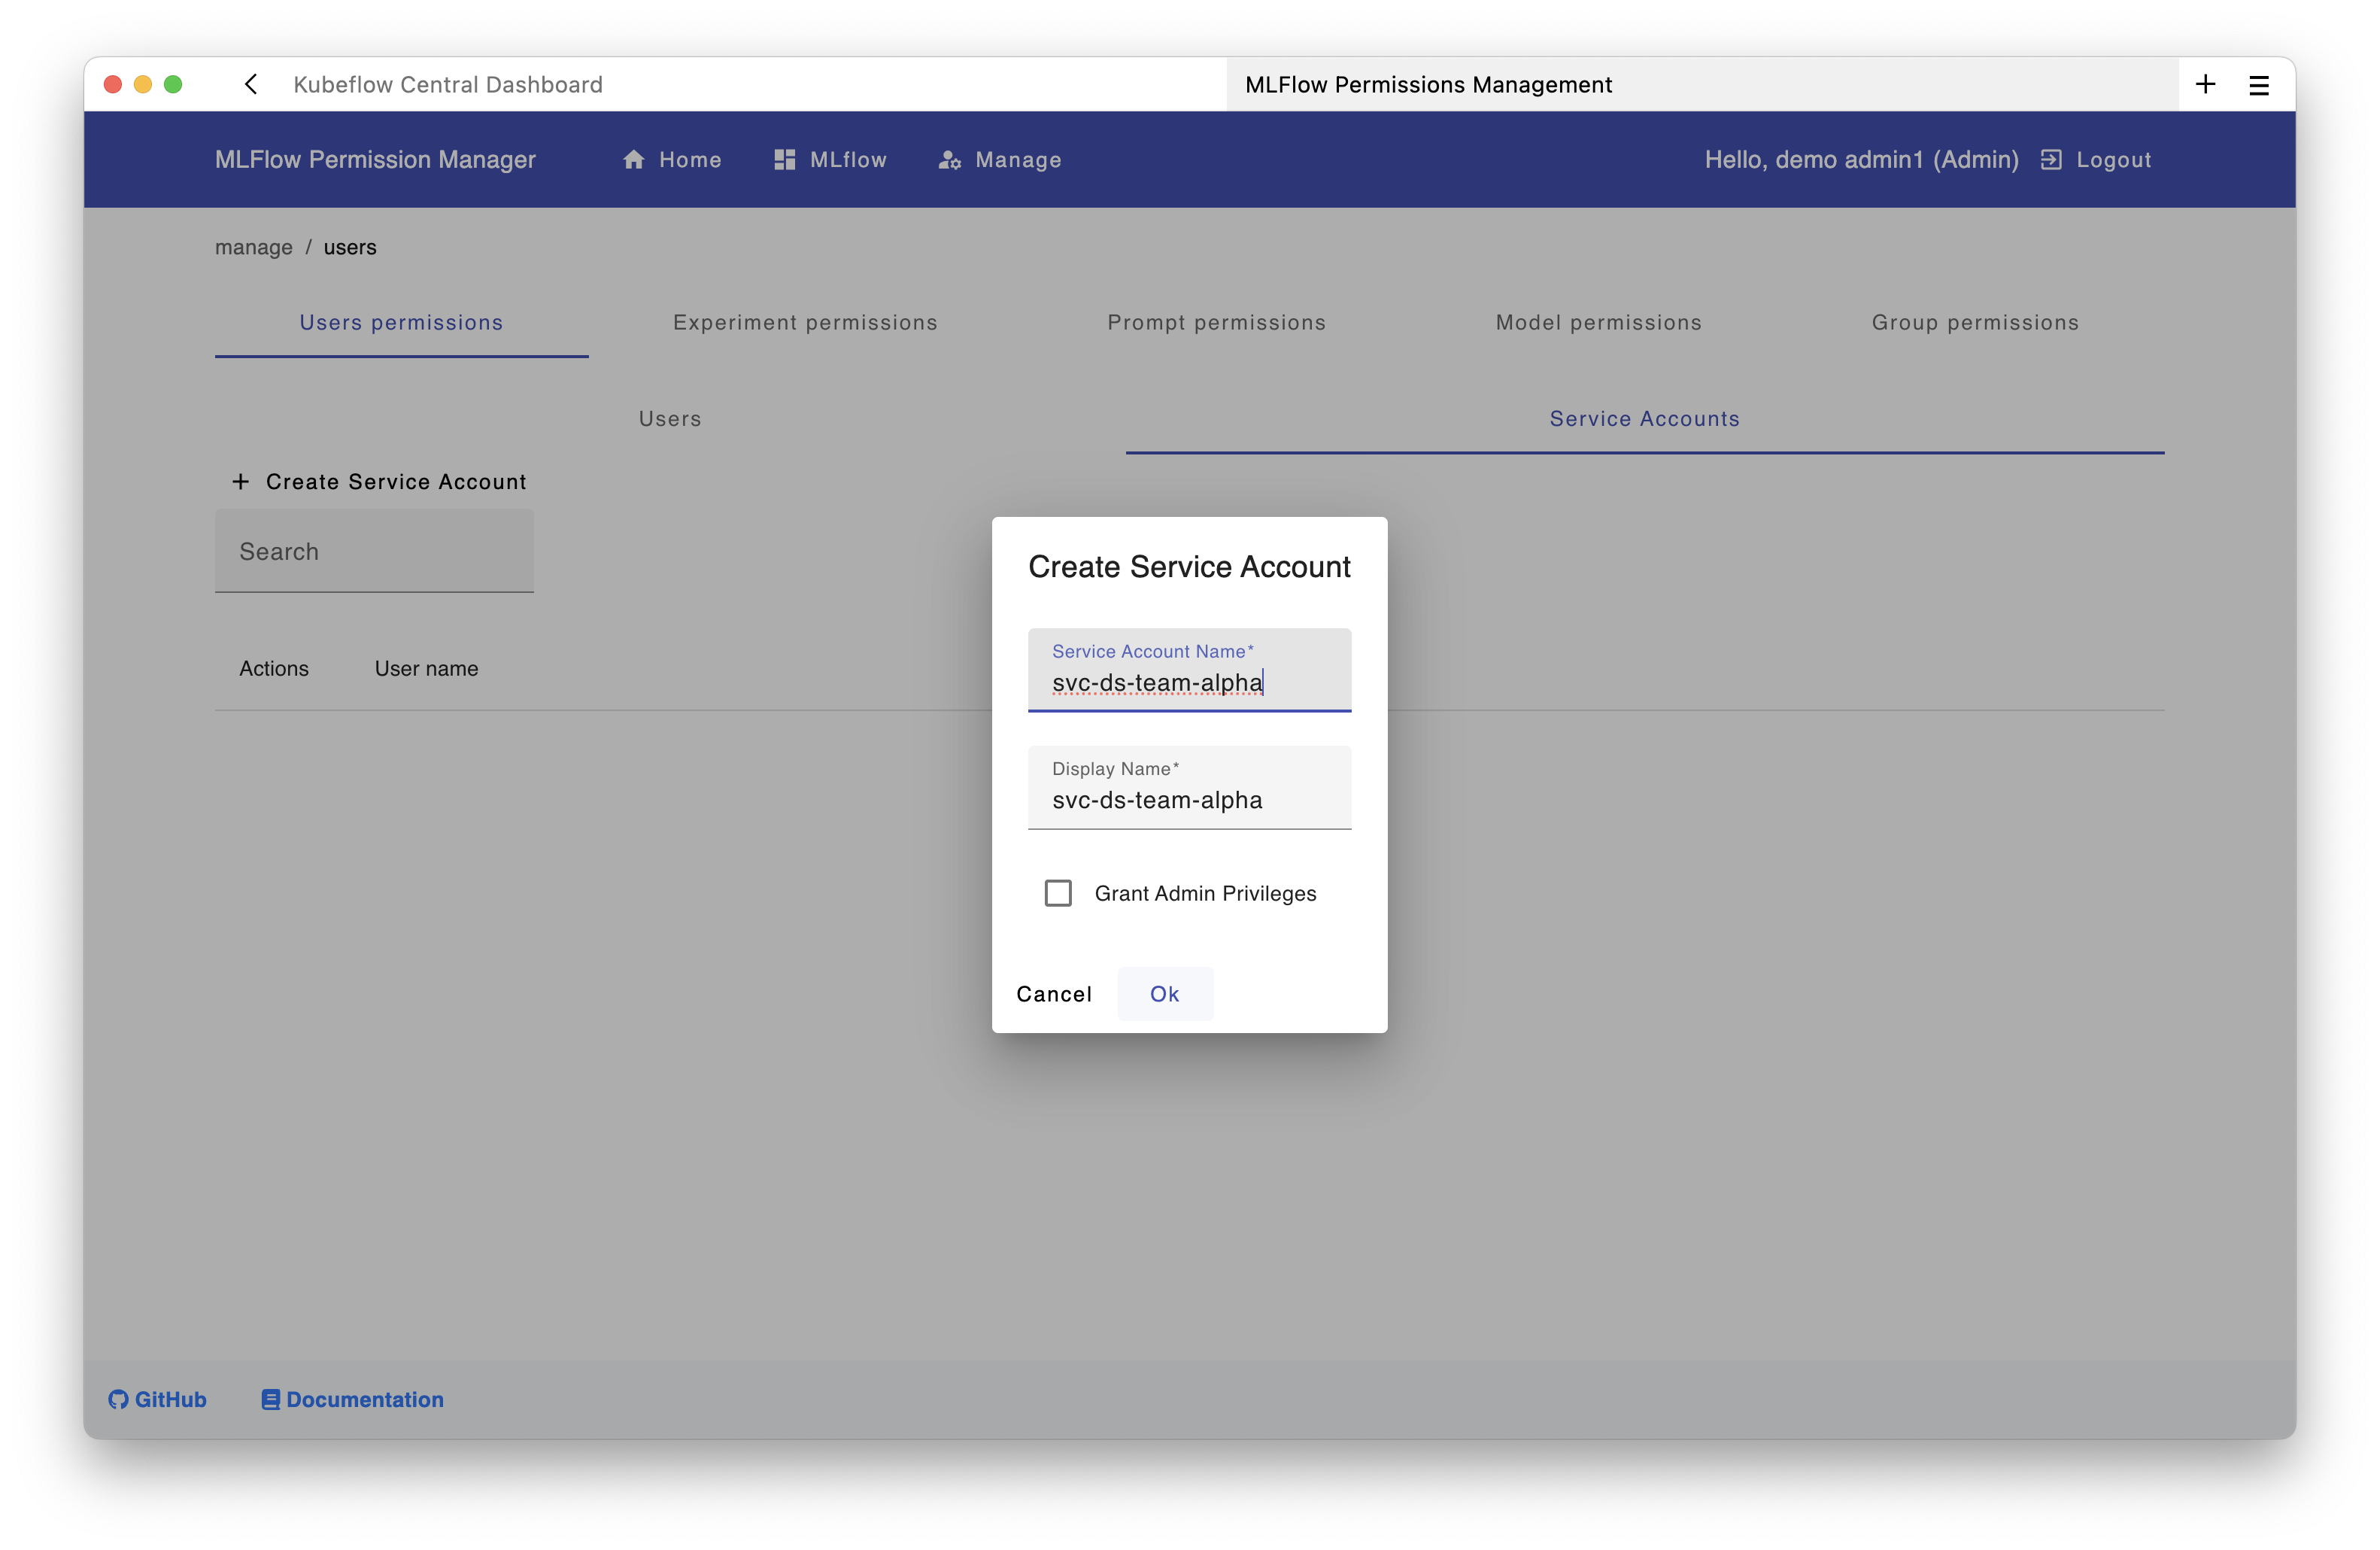
Step 3: Create a Service Account⚓︎
For shared namespaces/profiles in Kubeflow, you should use service accounts instead of personal access tokens that individual users create for use in KFP pipelines.
Using the UI:
Create the service account through the permissions interface:
Then grant this service account edit permissions on the ds-team-alpha-exp1 experiment:
Using the API:
curl -X POST "https://<your-domain>/mlflow/api/2.0/mlflow/users/create" \
  -u "admin@example.com:<your-admin-pat>" \
  -H "Content-Type: application/json" \
  -d '{
    "username": "svc-ds-team-alpha",
    "display_name": "DS Team Alpha Service Account",
    "is_admin": false,
    "is_service_account": true
  }'
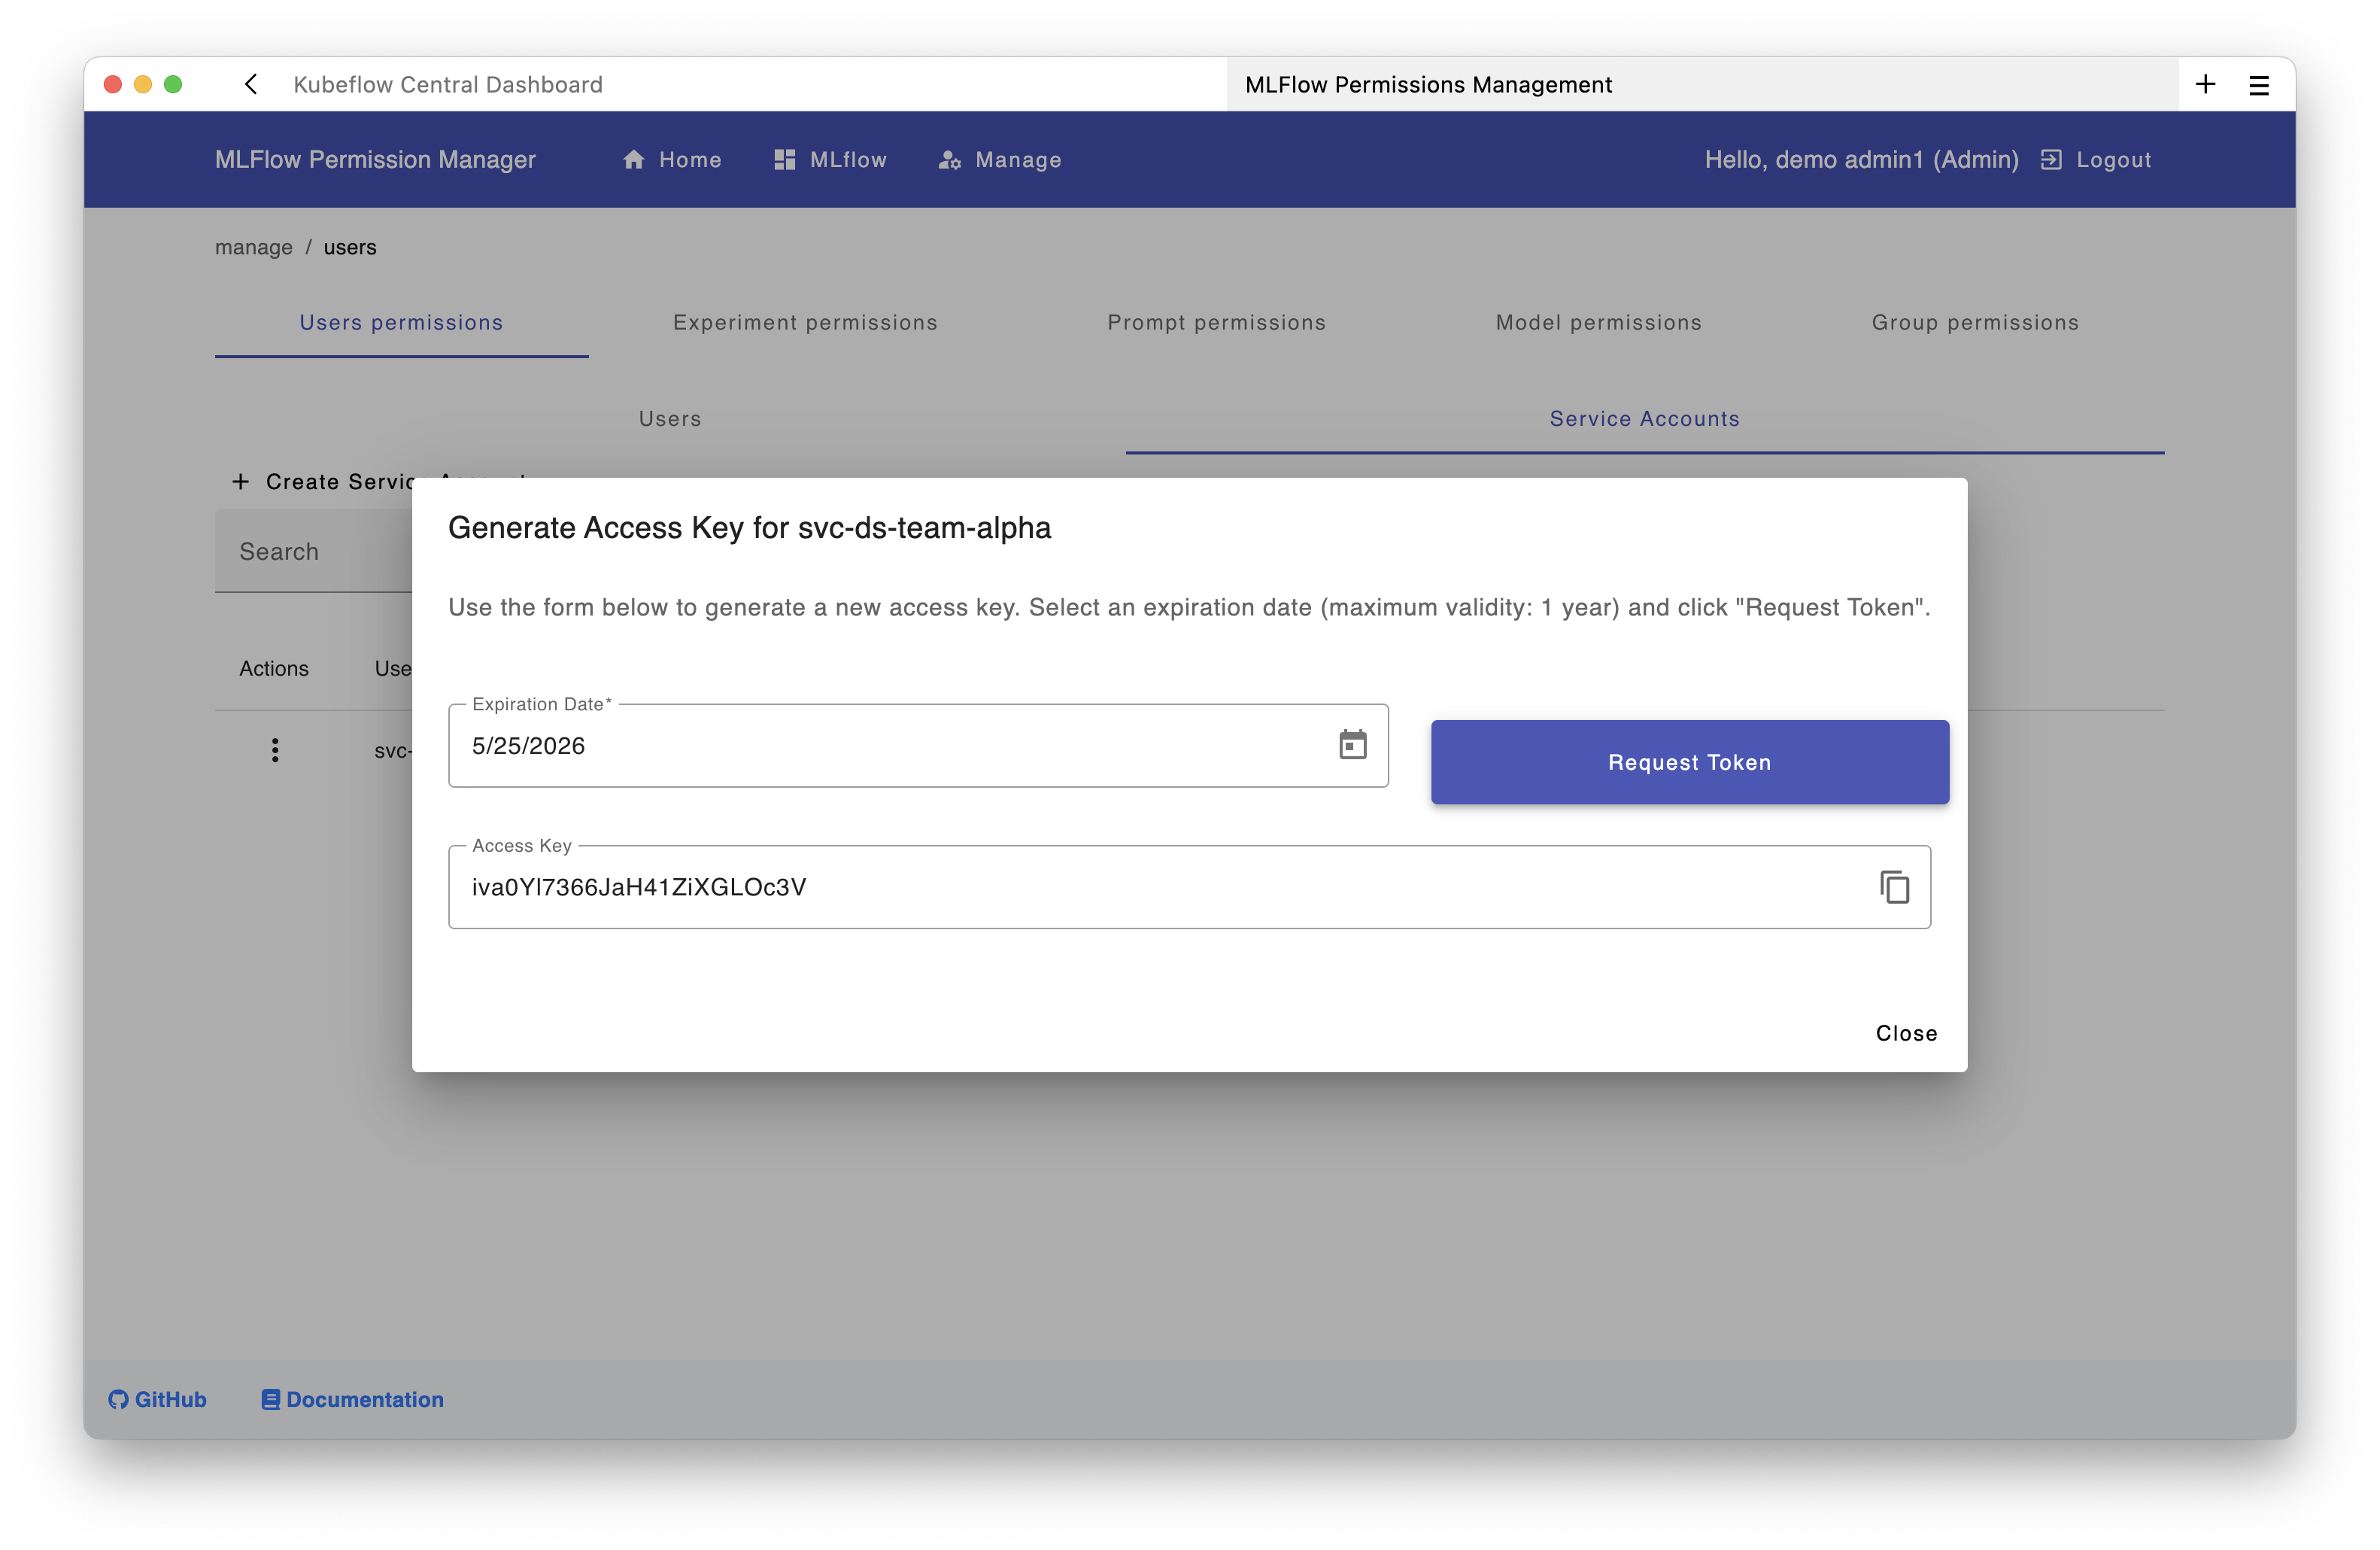
Step 4: Generate a Token for the Service Account⚓︎
Using the UI:
Generate the token through the permissions interface:
Using the API:
curl -X PATCH "https://<your-domain>/mlflow/api/2.0/mlflow/permissions/users/access-token" \
  -u "admin@example.com:<your-admin-pat>" \
  -H "Content-Type: application/json" \
  -d '{"username": "svc-ds-team-alpha", "expiration": "2026-10-31T23:59:59Z"}'
Tip
To invalidate or revoke an existing MLflow token for the service account, generate a new one in the UI.
Step 5: Store Service Account Credentials⚓︎
As described in the user documentation, we recommend creating a Kubernetes secret containing the service account token in the team's namespace.
Create a secret in the team's namespace:
kubectl create secret generic mlflow-team-credentials \
  --from-literal=MLFLOW_TRACKING_URI="https://<your-domain>/mlflow/" \
  --from-literal=MLFLOW_TRACKING_USERNAME="svc-ds-team-alpha" \
  --from-literal=MLFLOW_TRACKING_PASSWORD="<service-account-token-from-step-4>" \
  -n "ds-team-alpha"
Step 6: Make Credentials Available to Notebooks⚓︎
Create a PodDefault to automatically inject the credentials into notebooks.
Create the PodDefault YAML file:
apiVersion: kubeflow.org/v1alpha1
kind: PodDefault
metadata:
  name: mlflow-team-access
  namespace: ds-team-alpha
spec:
  selector:
    matchLabels:
      mlflow-team-access: "true"
  desc: "MLflow team credentials"
  envFrom:
  - secretRef:
      name: mlflow-team-credentials
Apply the PodDefault:
kubectl apply -f poddefault.yaml -n ds-team-alpha
Using the PodDefault in Notebooks:
When team members create a notebook, they can select the MLflow configuration:
- In the notebook creation form, expand "Advanced Options" (blue section at the bottom)
- Select the "MLflow team credentials" configuration
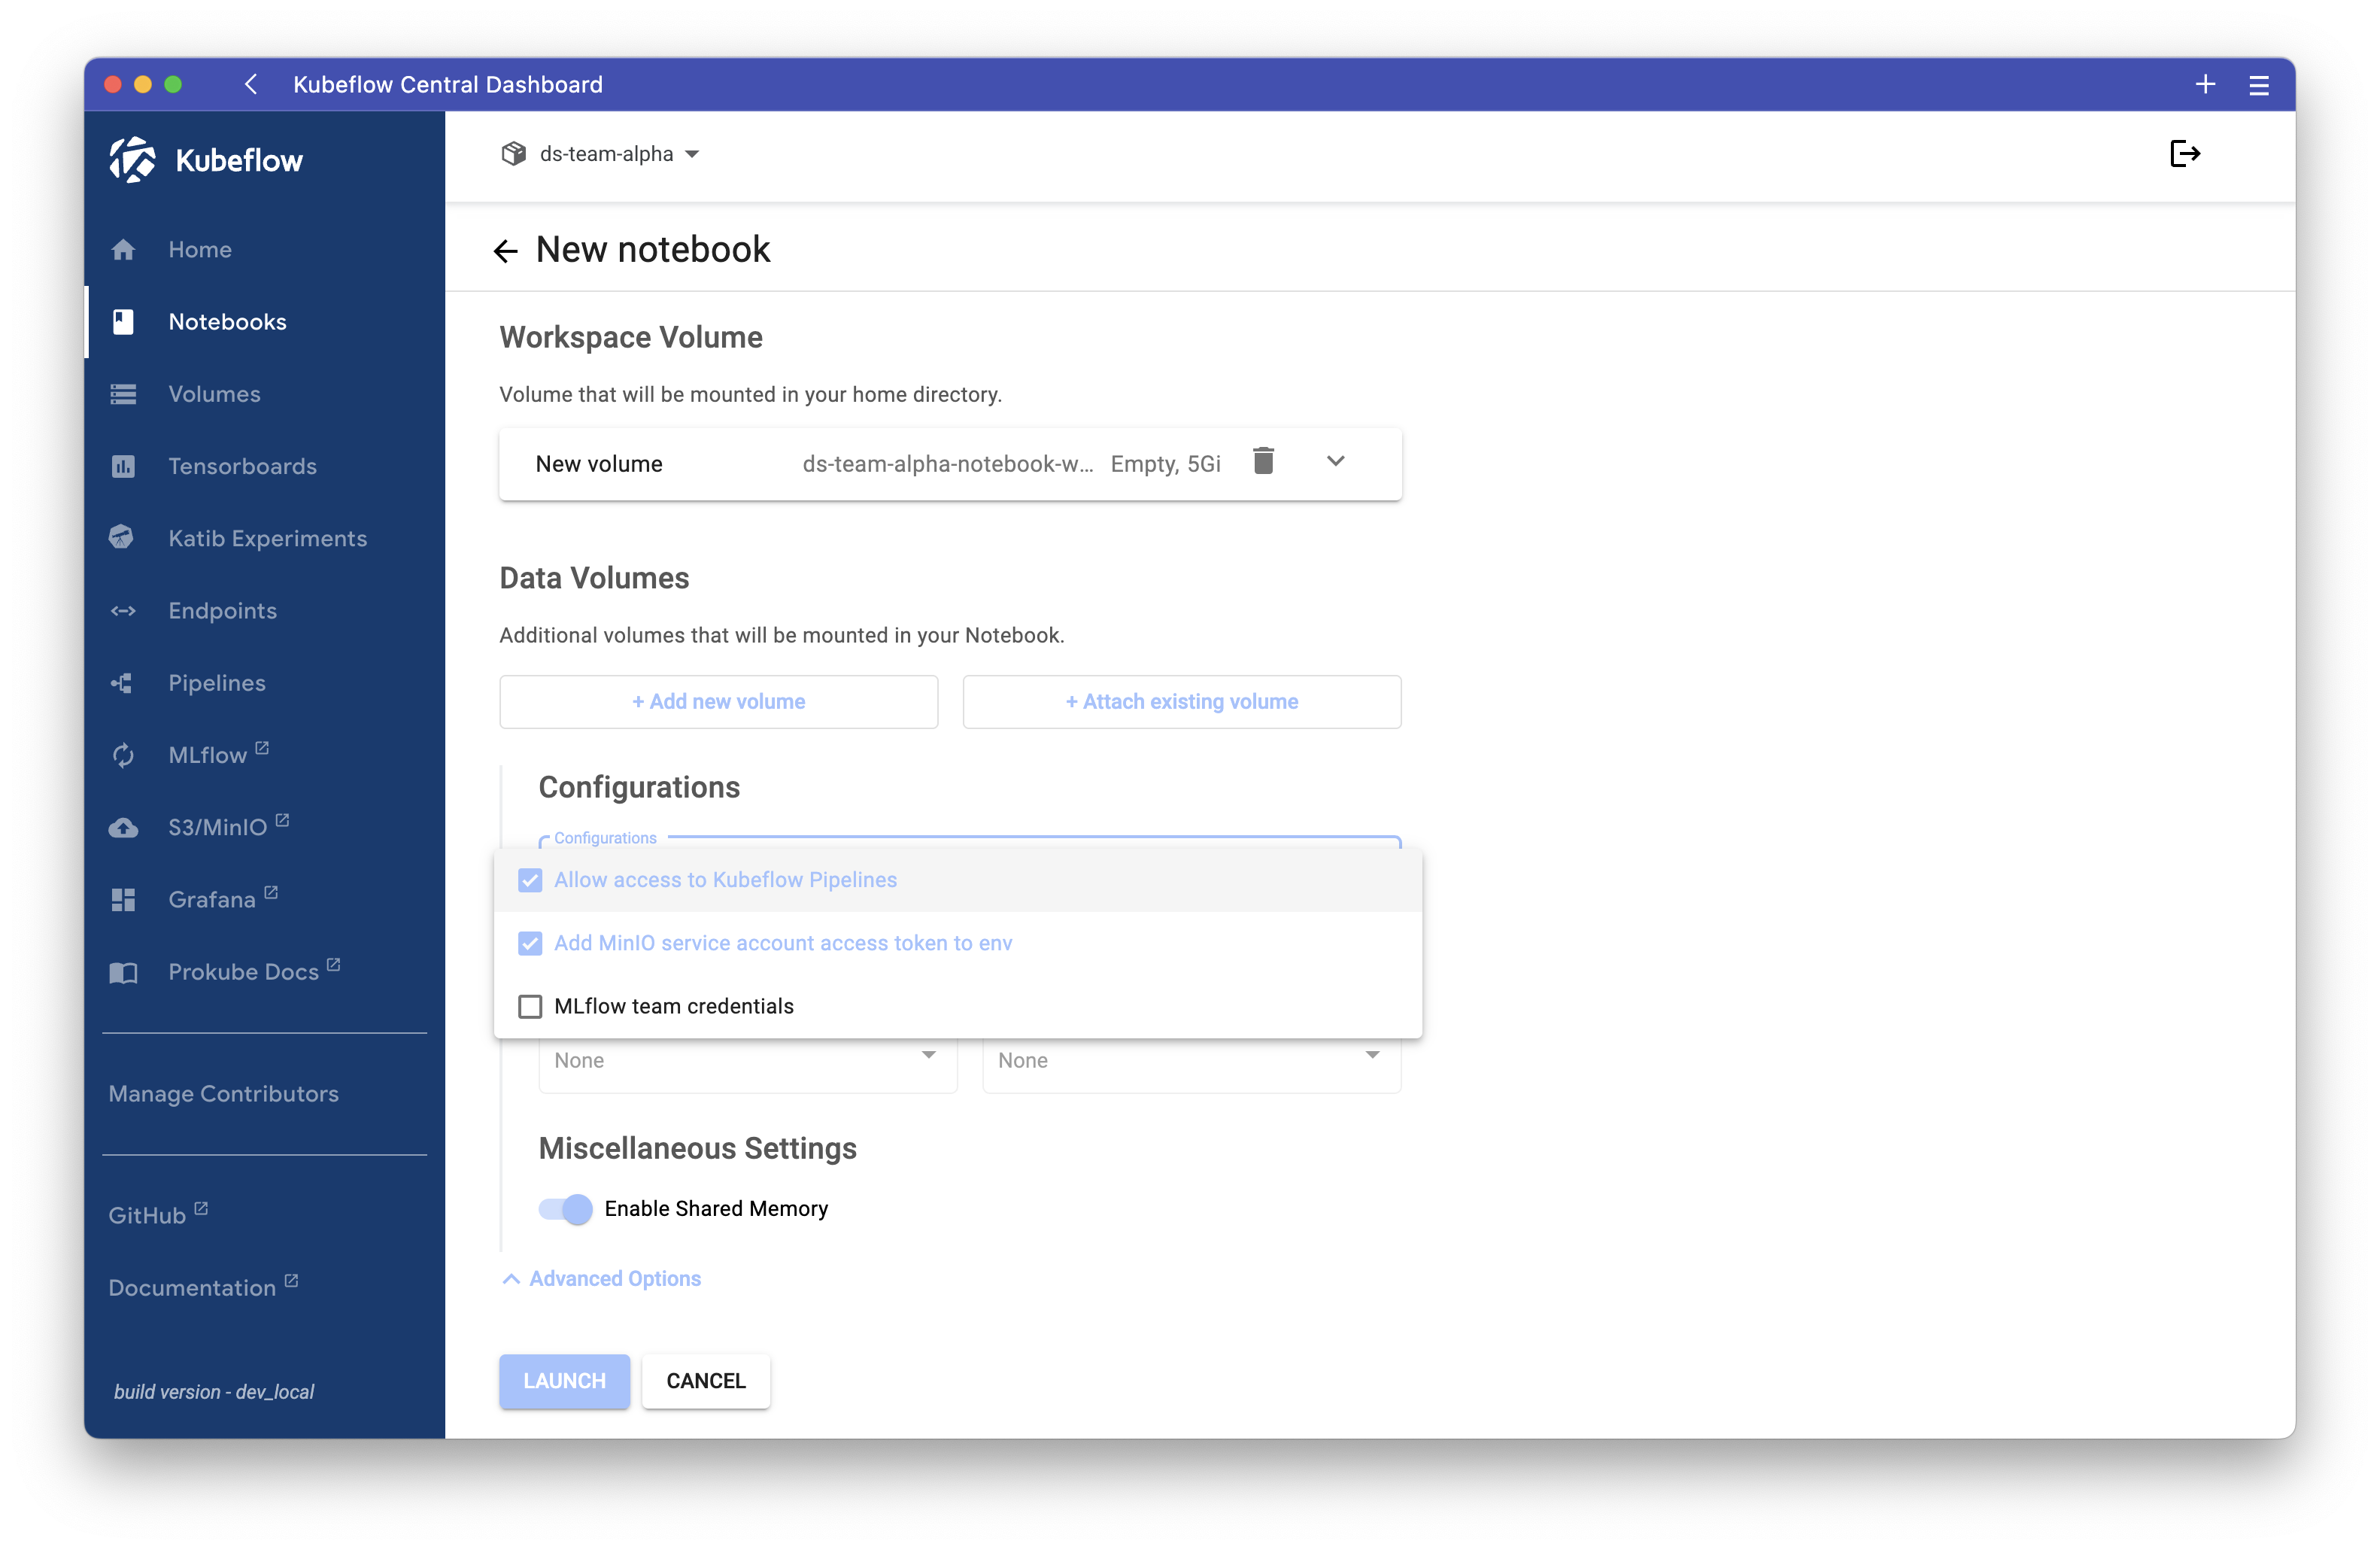
Secret Required
The PodDefault will only work if the secret mlflow-team-credentials has been created first (Step 5).
Once the notebook starts with this configuration, the necessary environment variables are automatically set, and users can immediately communicate with the MLflow server using the service account:
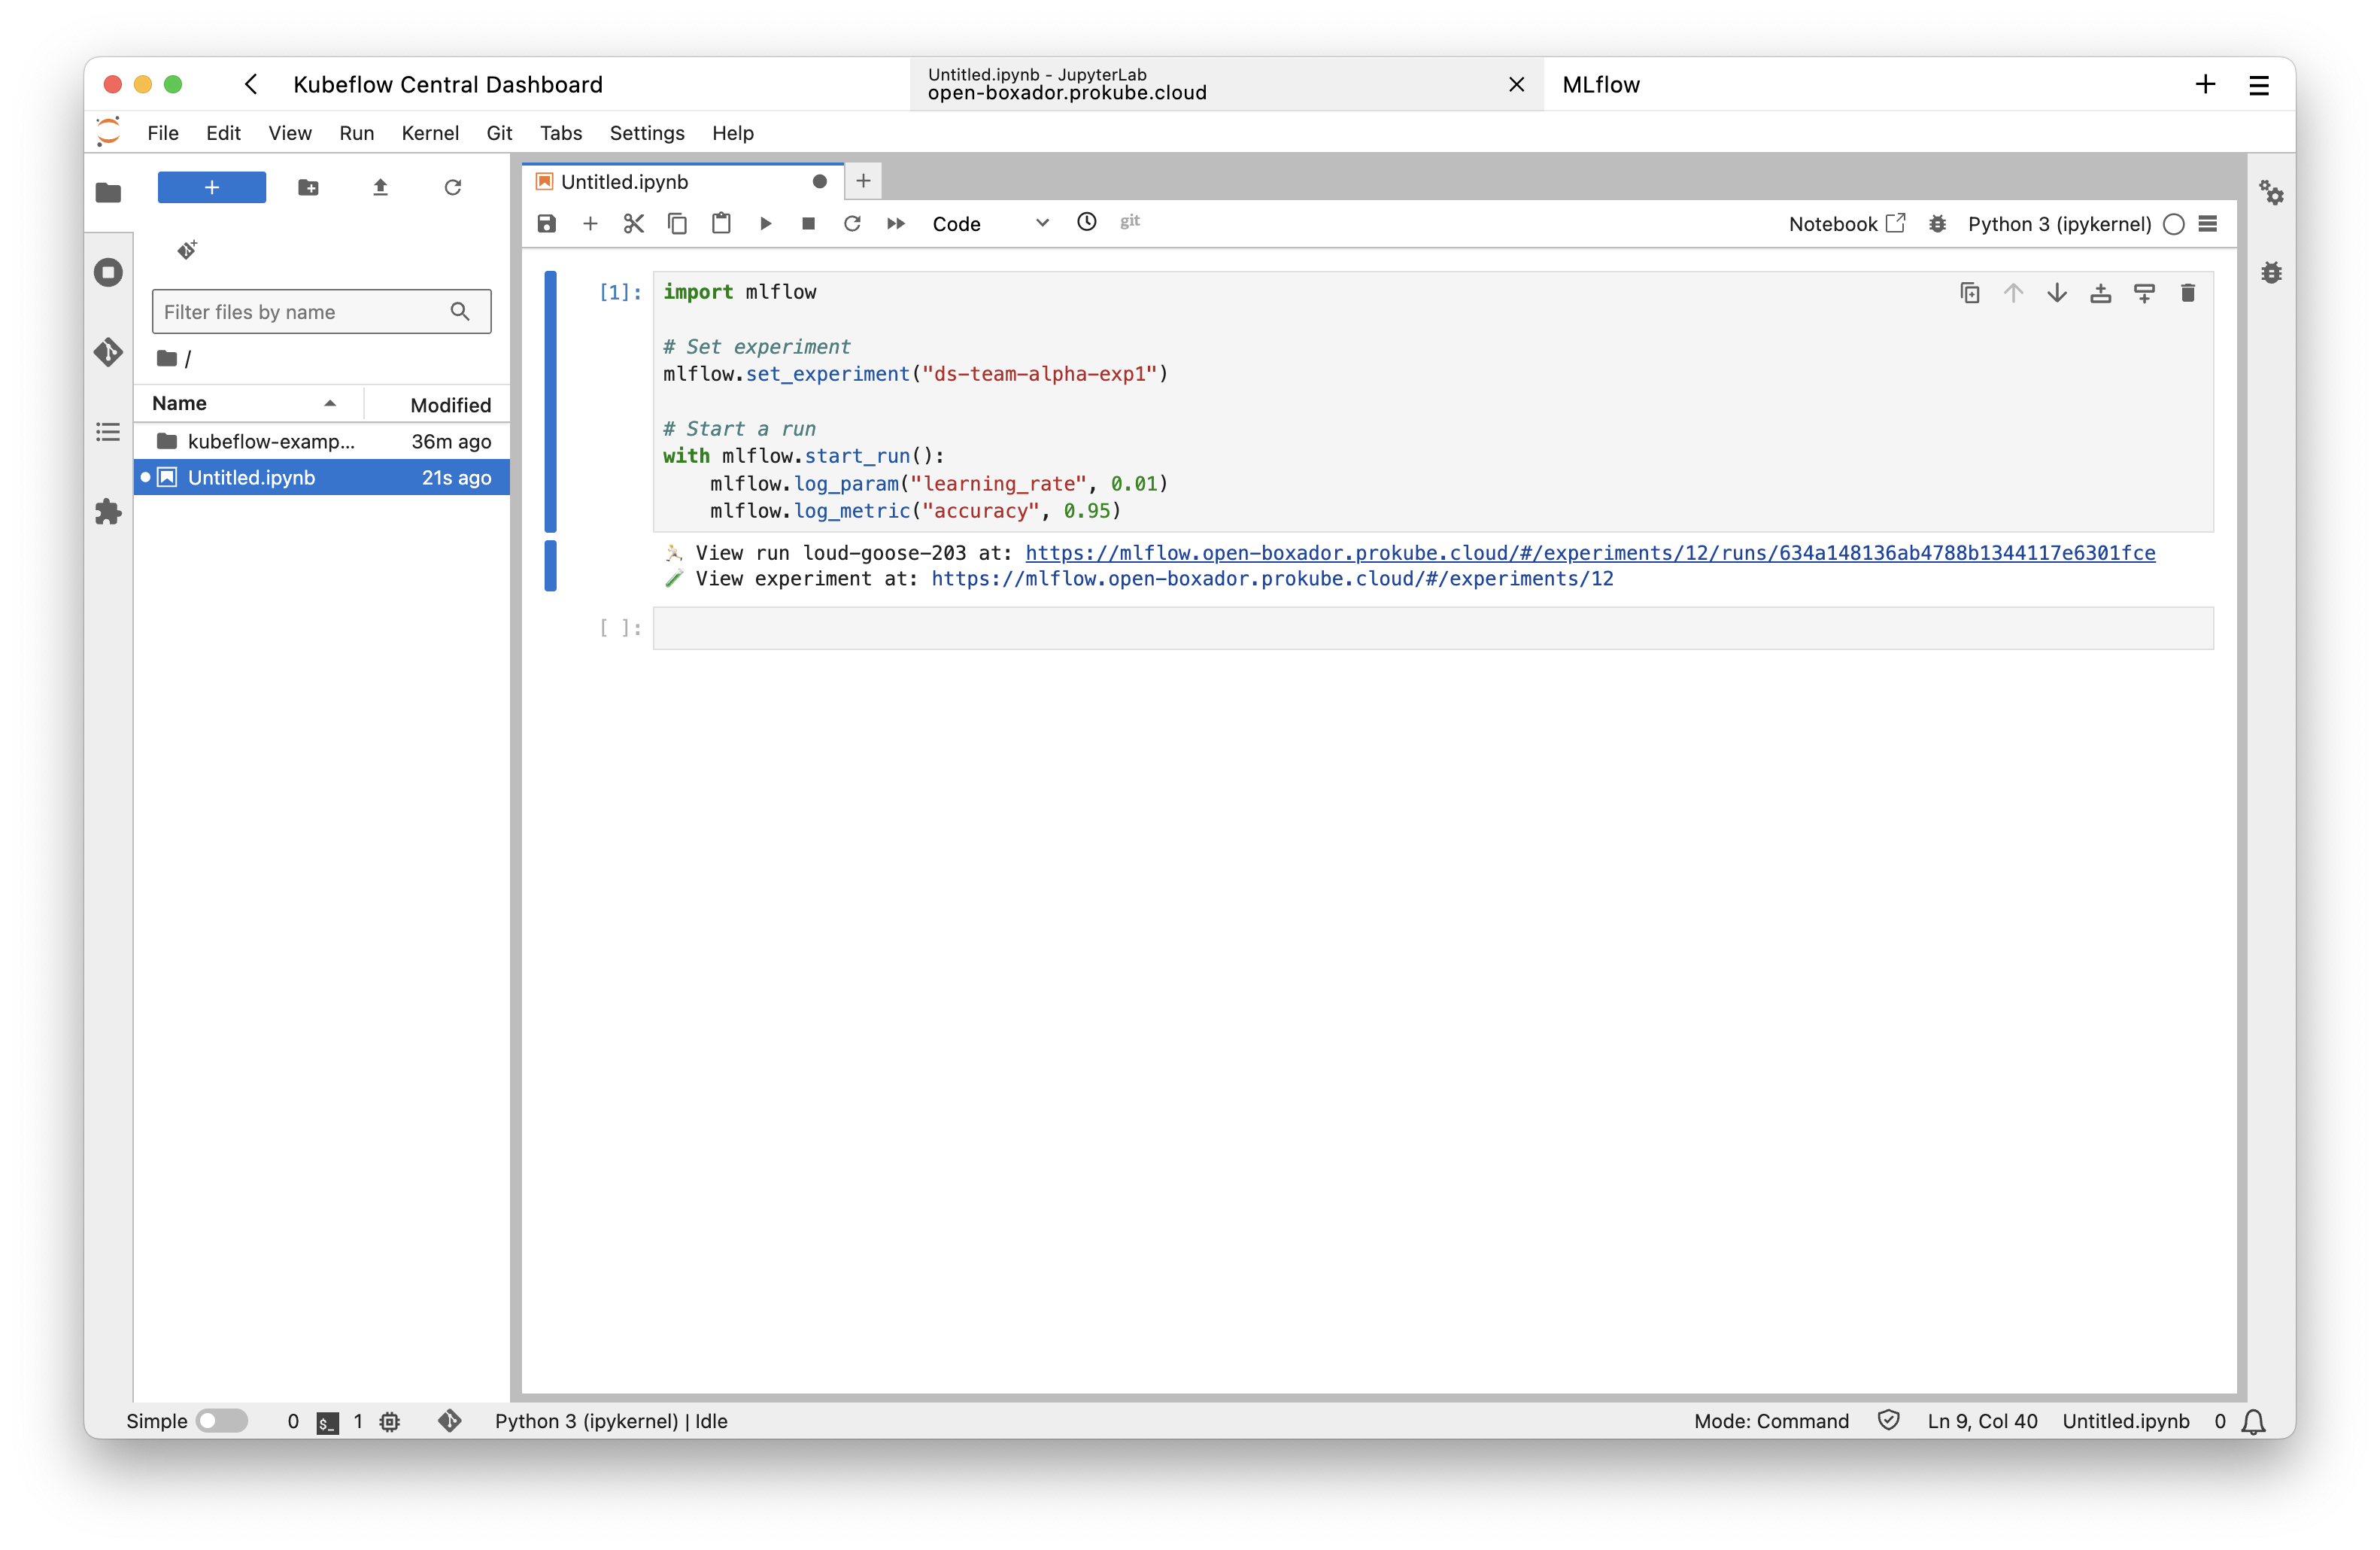
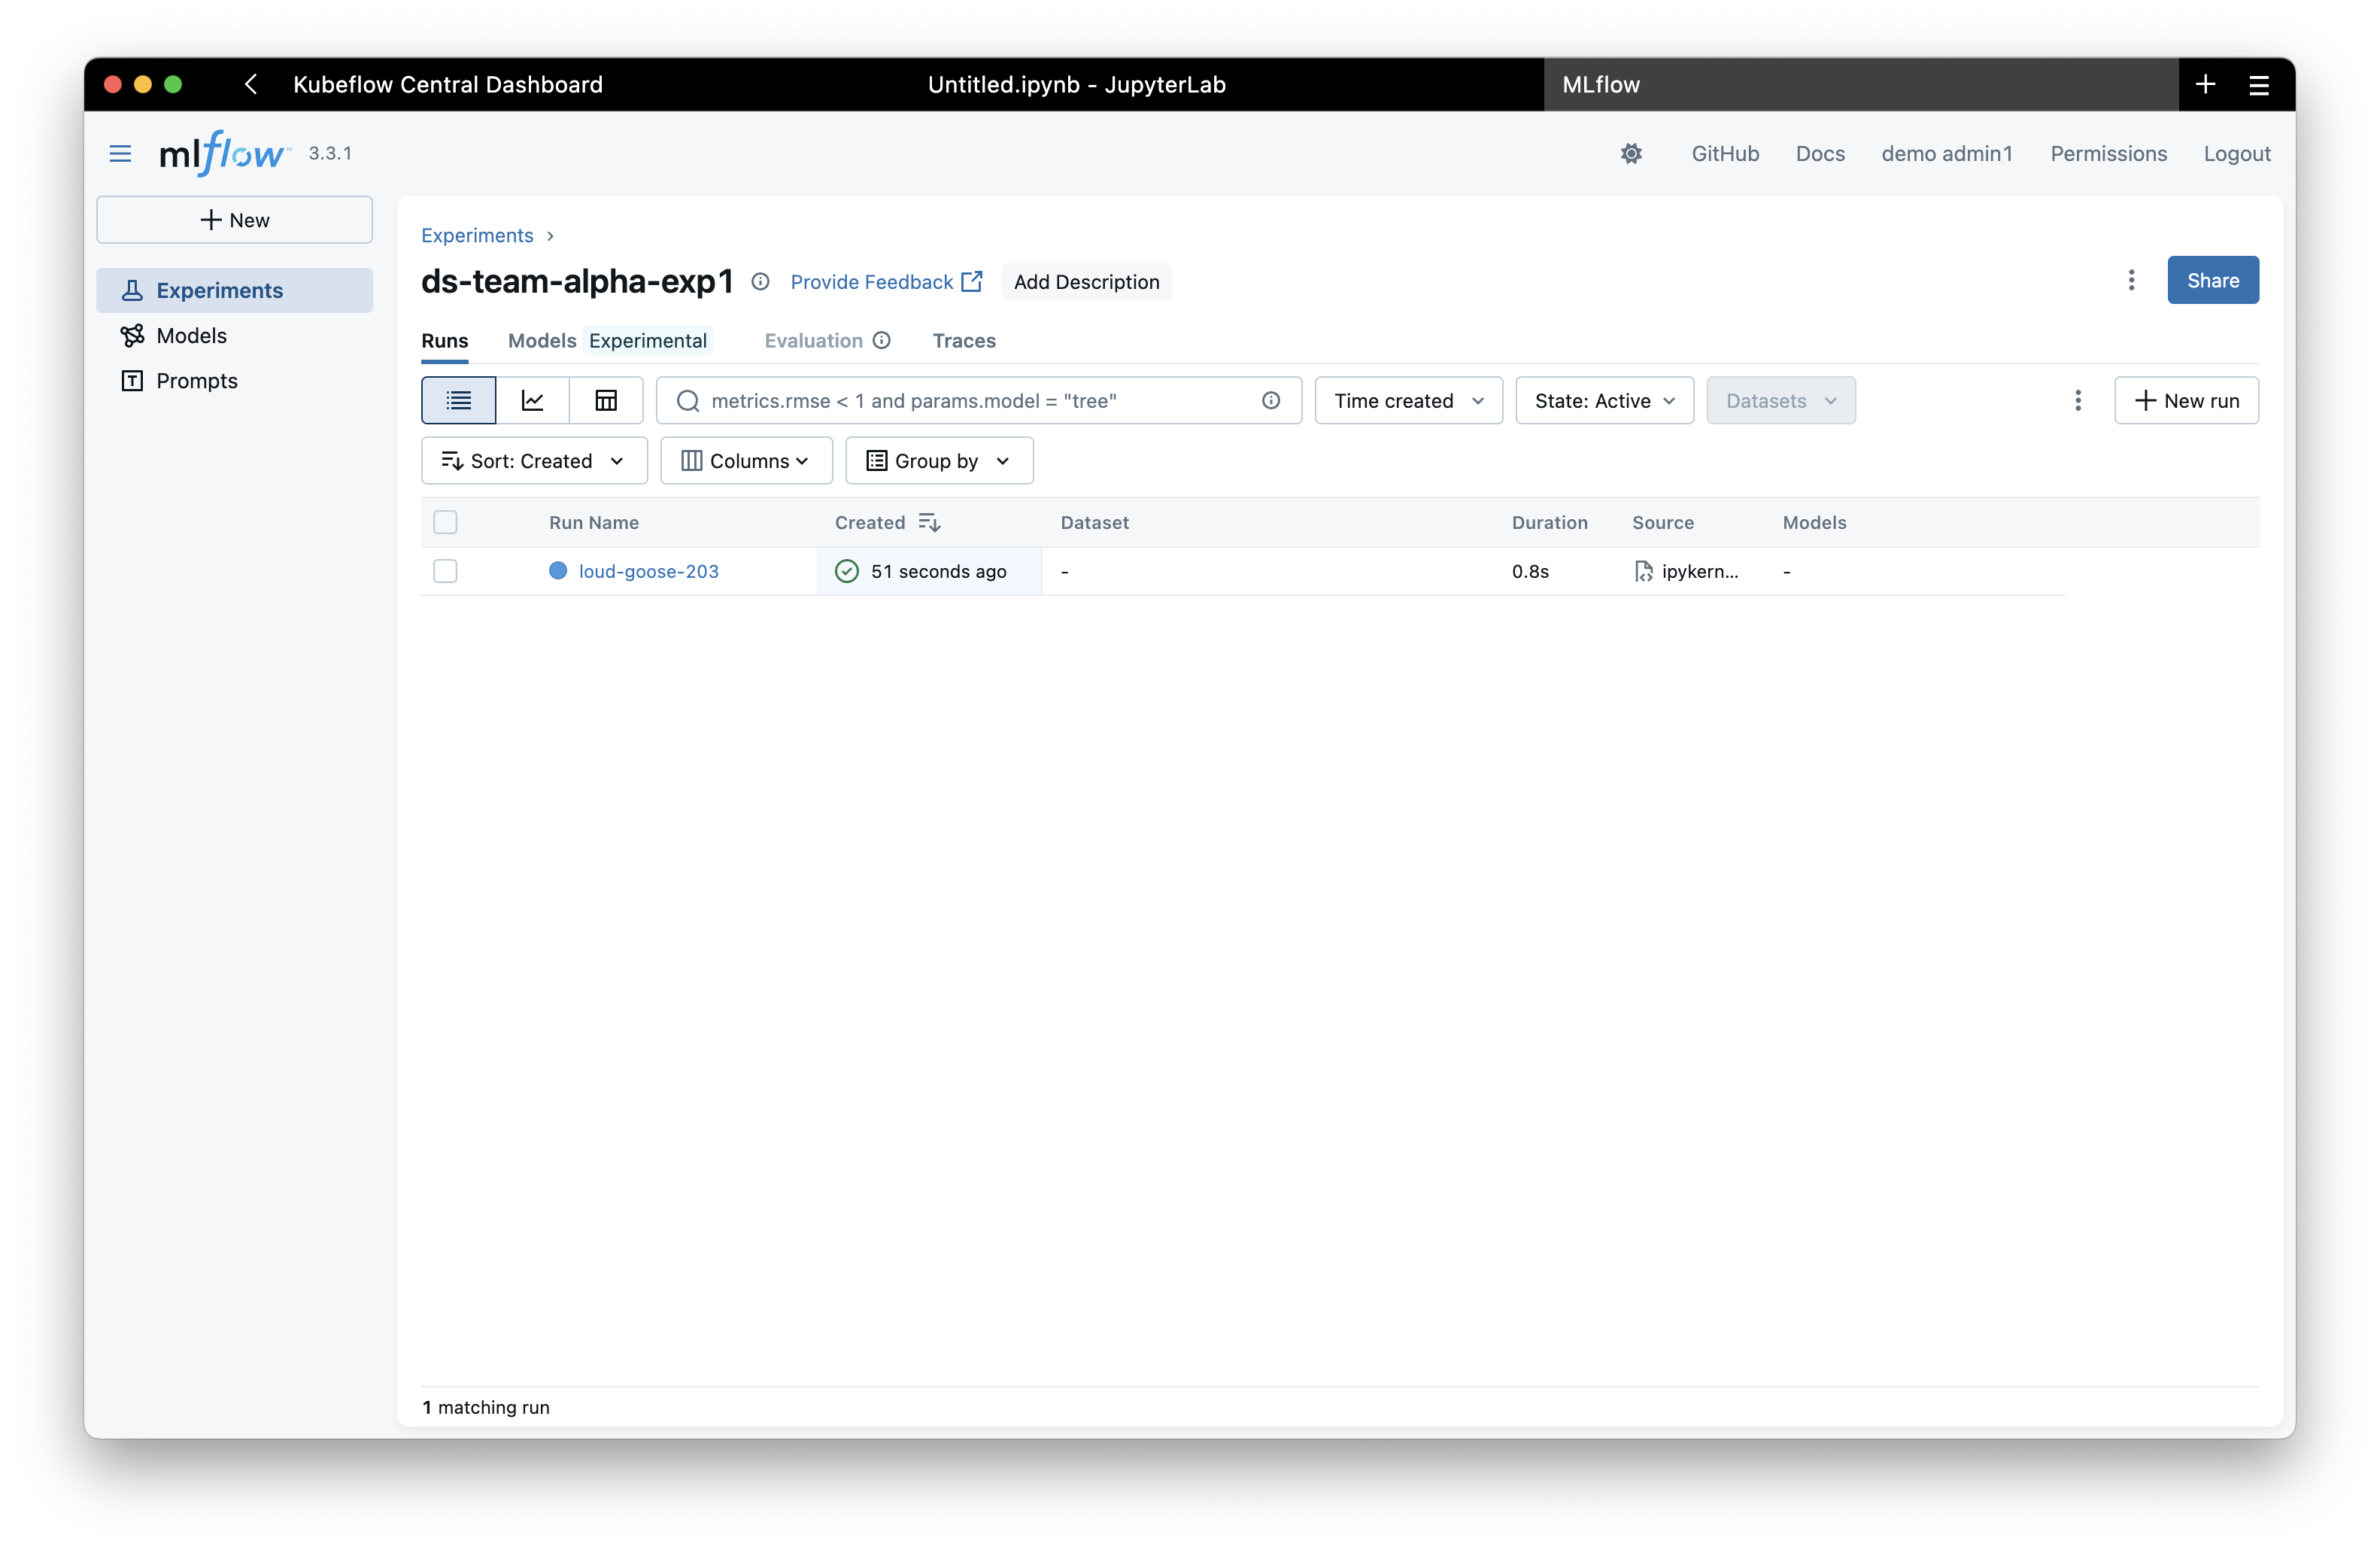
The experiment will then be visible in the MLflow UI:
Permissions Management⚓︎
Understanding Groups⚓︎
- Keycloak realm roles (e.g.,
pk:data-science-team) are automatically synced as MLflow groups - Groups are created when users with those roles first login to MLflow
- Service accounts can't be added to groups but can receive direct permissions
Note
If a user was already logged in (i.e., had an existing JWT token) before being added to the group, they must log out and log in again to refresh the token and receive the updated group claims. This is expected behavior with JWTs.
Permission Levels⚓︎
- READ: View experiments/models
- EDIT: Update runs, log metrics
- MANAGE: Full control including deletion
- NO_PERMISSIONS: Explicitly deny access
Garbage Collection⚓︎
When you delete experiments, models, or prompts through the MLflow UI, they are marked as "deleted" but remain in the database and artifact store. This means:
- The resources are no longer visible in the UI
- Their names cannot be reused for new resources
- Storage space is not freed up
To permanently delete these resources and free up their names and storage, you need to run the MLflow garbage collection command.
Running Garbage Collection⚓︎
Run the following command to execute garbage collection in the MLflow tracking server pod:
kubectl exec -n mlflow deployment/mlflow-mlflow-tracking-server -- \
  bash -c 'MLFLOW_TRACKING_URI="http://localhost:8080" mlflow gc --backend-store-uri "$MLFLOW_BACKEND_URI" --artifacts-destination "s3://mlflow-artifacts/"'
This command will: - Permanently delete all experiments, runs, models, and prompts marked as "deleted" - Remove their artifacts from the MinIO storage - Free up their names for reuse
Permanent Deletion
Garbage collection is irreversible. Once deleted, experiments and their artifacts cannot be recovered. Make sure you want to permanently delete the resources before running this command.
For more options (e.g., selective deletion, time-based filtering), see the MLflow GC documentation.