Notebooks⚓︎
Links to external documentation
Kubeflow provides notebook servers for running interactive development environments. These can be managed through the Notebooks tab in the Kubeflow web UI. Each notebook server runs as a Kubernetes pod and supports different IDE options including JupyterLab, Visual Studio Code Server, and RStudio. While Kubeflow maintains a set of community images for these servers, our platform uses customized versions of these images with additional tools and preconfigurations to facilitate the integration with other tools within the prokube platform.
Create a new notebook⚓︎
Clicking the "New Notebook" button will open the dialog for creating a new notebook.
- Name: The name of the notebook server. Only alphanumeric characters and hyphens are allowed.
- Type: The type of the notebook server.
- "JupyterLab" sets up a JupyterLab server for accessing through a web browser.
- "VisualStudioCode" sets up a browser-based instance of VisualStudioCode
- "RStudio" sets up a browser-based instance of RStudio.
- "Custom Notebooks": For JupyterLab notebooks, various images are available through a dropdown menu, each with different pre-installed Python packages. Additionally, KF-Notebooks can be used to host any custom web server, which is particularly useful for rapid prototyping. For technical details on implementing custom servers, refer to the official documentation.
- CPU / RAM: The amount of CPU and RAM to allocate to the notebook server.
- GPUs: The number of GPUs to allocate to the notebook server.
- Workspace Volume: The home directory of the container (/home/jovyan) is mounted to a persistent volume. This allows you to save files and data over notebook server shutdowns. You can choose to use an existing volume or create a new one, but never use a workspace volume for multiple notebook servers in parallel!
- Data Volumes: Additional volumes can be mounted to the notebook server. You can choose to use an existing volume or create a new one. Data volumes (unlike workspace volumes) can be used in multiple notebook servers in parallel. This is useful for sharing data between notebooks or for accessing data from other sources.
- Configurations: Optional settings that can be applied to your notebook, such as environment variables from secrets or custom labels. These are configured by your administrator using PodDefaults.
Start and stop a notebook⚓︎
A running notebook server will block the allocated resources (CPU, memory and GPU) on the cluster or server and prevent your teammates from utilizing them. So you should stop your notebook server when you are not using it. You can start and stop a notebook server by clicking the "Start" and "Stop" buttons in the notebook list.
Persistence⚓︎
The home directory of the container (/home/jovyan) is mounted to a persistent volume called the "workspace volume". This allows you to save files and data across notebook server restarts.
What is persisted⚓︎
- All files and directories under
/home/jovyan - Installed software in your home directory (e.g., NVM, Homebrew, Starship)
- Shell configuration files (
.bashrc,.zshrc, etc.)
What is NOT persisted⚓︎
- Python packages installed with
pip installor%pip install: These are installed into system directories outside your home directory and are lost when the notebook restarts. To persist Python packages, either:- Use a custom notebook image with your packages pre-installed (recommended for production)
- Install packages into your home directory with
pip install --user package-name - Re-run the install commands when starting a new session
- System-level changes and files outside
/home/jovyan - Running processes and in-memory state
Data storage recommendations⚓︎
Use MinIO for datasets and artifacts
While the workspace volume is suitable for code, notebooks, and configuration files, we recommend using MinIO object storage for:
- Large datasets: Object storage scales better than persistent volumes
- Shared data: Multiple notebooks and pipelines can access the same buckets
- Pipeline artifacts: Kubeflow Pipelines integrates natively with S3-compatible storage
- Model artifacts: MLflow and KServe store models in MinIO
The MinIO CLI (mc) is pre-configured in prokube notebook images. See How do I interact with MinIO storage? for usage.
Volume usage notes⚓︎
Workspace volumes should not be used for multiple running notebook servers in parallel. If you need to share data between notebooks or access data from other sources, you can create additional data volumes. Data volumes can be used in multiple notebook servers in parallel.
Volume management⚓︎
When you delete a notebook server, the mounted volumes are not deleted automatically. If you no longer need a volume, you can delete it manually in the Volumes tab. Please remember to delete volumes that are not used anymore, because they block local storage on the cluster or server.
Modify an existing notebook⚓︎
Existing notebook servers cannot be modified directly, but there is an indirect way. Stop the notebook server, then create a new notebook server with the desired configuration. But instead of creating a new workspace volume, use the existing workspace volume of the old notebook server. This way you will keep your files and data (from the home directory). The old notebook server can be deleted. Remember to stop the old notebook server before using its workspace volume in a new notebook server.
Delete a notebook⚓︎
You can delete a notebook server by clicking the button with the delete symbol in the notebook list. The notebook server will be stopped, and the pod will be deleted. The workspace volume will not be deleted automatically. You can delete it manually in the Volumes tab.
Custom images⚓︎
It is possible to use custom images for your notebook containers. This can have various advantages, but the images have to follow certain requirements. See the Notebook images documentation for more information or ask your administrator for help. Our custom notebook images contain, among others, the following tools: neovim, less, nano, ncdu, openssh-client, tig, tmux, tree, unzip, wget, zip, zsh, gcc, ripgrep, fzf, make, go and MinIO client (mc).
S3 Browser (s3jupyter)⚓︎
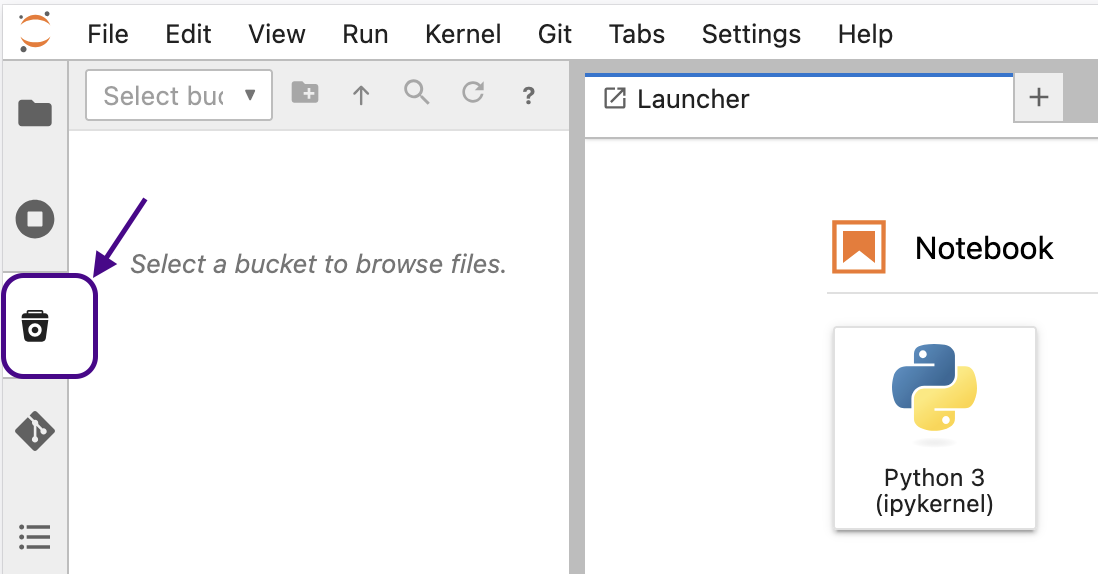
Our custom JupyterLab notebook images include an extension which provides an S3 file browser directly in the JupyterLab sidebar. It allows you to browse, upload, download, and manage files in your MinIO buckets without leaving the notebook interface.
Getting started⚓︎
The extension is pre-configured in prokube notebook images - no additional setup is required. To use it:
- Open a JupyterLab notebook server
- Click the S3 icon in the left sidebar
- Select a bucket from the dropdown (type to filter)
- Browse, upload, download, and manage your files
Features⚓︎
- Browse: Navigate buckets and folders with breadcrumb navigation
- Upload: Drag and drop files from your desktop into the browser, or use the upload button in the toolbar
- Download: Double-click or right-click a file and select "Download"
- Search: Click the search icon in the toolbar to filter visible files, or press Enter to search recursively through subfolders
- Copy S3 path: Right-click a file and select "Copy Path" to copy the
s3://bucket/keypath to your clipboard - Load Data snippets: Right-click a file and select "Load Data..." to get ready-to-use code snippets for loading the file with pandas, boto3, s3fs, or the AWS CLI
- Drag to notebook: Drag a file from the S3 browser into a notebook cell to paste its S3 path
- Manage files: Create, rename, and delete folders and files via the toolbar or context menu
Configuration⚓︎
The extension uses the following environment variables, which are pre-configured in prokube notebooks:
| Variable | Description |
|---|---|
AWS_ENDPOINT_URL |
S3 endpoint URL (set automatically by the MinIO PodDefault) |
AWS_ACCESS_KEY_ID |
Access key (injected via service account token) |
AWS_SECRET_ACCESS_KEY |
Secret key (injected via service account token) |
S3_BUCKET |
Default bucket to select on startup (optional) |
No manual configuration is needed when using the default prokube notebook images with the MinIO PodDefault configuration applied.
FAQ⚓︎
My notebook server does not start⚓︎
Checking Events and Logs⚓︎
Start by examining the events and logs of the notebook server pod in the Kubeflow web UI. If this does not reveal the problem, obtain a more detailed description of the pod using the command:
kubectl describe pod <pod-name> -n <namespace>
Handling Common Errors⚓︎
If you encounter the following error message:
upstream connect error or disconnect/reset before headers. reset reason: connection failure, transport failure reason: delayed connect error: 111
PVC Mount Failures⚓︎
Should you find errors indicating that a Persistent Volume Claim (PVC) could not be mounted:
- First, check if the PVC is currently in use by another notebook or any pod within the cluster. The "Volumes" tab in the Kubeflow UI provides useful insights.
- If the PVC is not in use, consult with your administrator to explore deeper into the issue.
Resolving VolumeAttachment Errors⚓︎
In rare cases, if the 'VolumeAttachment' was not correctly deleted when stopping or deleting a notebook, you may see an error like:
Multi-Attach error for volume "pvc-xyz" Volume is already exclusively attached to one node and can't be attached to another
This issue can be addressed by manually deleting the VolumeAttachment, allowing the PVC to be reattached to a new pod:
kubectl get volumeattachments.storage.k8s.io | grep pvc-xyz # replace pvc-xyz with the actual PVC name from the error message
kubectl delete VolumeAttachment <name-of-volumeattachment>
How do I interact with MinIO storage?⚓︎
Our custom notebook images come pre-configured with the MinIO Command Line Interface (CLI) mc and a pre-set minio alias. This allows immediate access to your authorized MinIO buckets directly from your notebook's terminal. You can:
- List available buckets:
mc ls minio - Upload files:
mc cp local-file minio/bucket-name/ - Download files:
mc cp minio/bucket-name/file local-destination
The configuration automatically uses your Kubeflow credentials, so no additional setup is required. For advanced operations, please refer to the MinIO CLI documentation. For alternative ways to interact with MinIO, including web interface and SDK options, see our MinIO documentation.
I want to provide secret data as environment variables to my notebook⚓︎
You can use PodDefaults to apply specific settings to your notebook pods. For
example, to provide a secret as an environment variable to all notebooks in a
namespace, you can create a PodDefault like this:
apiVersion: "kubeflow.org/v1alpha1"
kind: PodDefault
metadata:
  name: add-my-secret
  namespace: <YOUR-NAMESPACE>
spec:
  selector:
    matchLabels:
      add-my-secret: "true"
  desc: "Add my super secrets to my env"
  env:
    - name: USER
      valueFrom:
        secretKeyRef:
          name: my-secret
          key: user
    - name: SECRETPASSWORD
      valueFrom:
        secretKeyRef:
          name: my-secret
          key: password
    - name: NON_SECRET_ENV
      value: "public"
This will add the environment variables USER, SECRETPASSWORD, and
NON_SECRET_ENV to all pods with the label add-my-secret: "true" in the
namespace <YOUR-NAMESPACE>.
You can add that label by going to the Advanced section at the bottom of the
notebook creation form and -- under Configurations -- tick the box labeled
"Add my super secrets to my env".
The USER environment variable will be set to the value of the user key in
the my-secret secret, and the SECRETPASSWORD environment variable will be set
to the value of the password key in the my-secret secret. The NON_SECRET_ENV
environment variable will be set to the value public.
You can create the corresponding secrets with the following command:
kubectl create secret generic my-secret -n <YOUR-NAMESPACE> --from-literal=password=test1234 --from-literal=user=user@example.com
In a notebook started with that setting, you can access the environment variables like this:
import os
print(os.environ['USER'])
print(os.environ['SECRETPASSWORD'])
print(os.environ['NON_SECRET_ENV'])
This should print:
user@example.com
test1234
public
To learn how to give pipelines access to secrets, see the KFP Cookbook section.
I want to change the limits of my notebook⚓︎
Option 1
Edit the custom resource (CR) of your notebook, e.g. use k9s to edit the resource of type notebooks.kubeflow.org. Make sure to change the limits of the right container (not the istio containers). If you change the memory settings of your pod, make sure to set limits and requests to the same value. If you change the CPU setting, only change limits, not requests.
This will restart your notebook
Option 2
Shutdown and delete your notebook, re-create a notebook with new limits and attach the existing persistent volume (PV).
On high-availability clusters, persistent volumes may occasionally fail to reattach to new notebooks. If this happens, contact your administrator.
After restarting my notebook, my data disappears⚓︎
Everything outside /home/jovyan is not persisted by default. Either keep your data under /home/jovyan or create new (or attach existing) additional PVs during notebook creation and save your data under the mount point.
My notebook does not disappear when I hit delete. How can I get rid of corresponding Pod?⚓︎
kubectl delete pod <notebook-name> --grace-period=0 --force -n <namespacename>
My PV is too small⚓︎
If it is the workspace volume, you can create a new notebook server with a larger workspace volume and attach the old workspace volume as an additional data volume. Then you can copy the data from the old workspace volume to the new workspace volume and delete the old workspace volume afterwards.
If it is a data volume, create a new notebook server with
- the workspace volume of the old notebook server
- the old data volume of the old notebook server
- a new larger data volume
Then you can copy the data from the old data volume to the new data volume and delete the old data volume afterwards.
Remember to never use a workspace volume for multiple running notebook servers in parallel!
How can I install Node.js and npm in my notebook?⚓︎
Our notebook images don't come with Node.js pre-installed, but you can install it using NVM (Node Version Manager) without root privileges:
# 1. Download and install NVM (Node Version Manager)
curl -o- https://raw.githubusercontent.com/nvm-sh/nvm/v0.39.7/install.sh | bash

# 2. Activate NVM for the current session
export NVM_DIR="$HOME/.nvm"
[ -s "$NVM_DIR/nvm.sh" ] && \. "$NVM_DIR/nvm.sh"
[ -s "$NVM_DIR/bash_completion" ] && \. "$NVM_DIR/bash_completion"

# 3. Install a Node.js version
nvm install 18  # or any other version
After installation, verify that Node.js and npm are available:
node -v  # Should display the installed Node.js version
npm -v   # Should display the npm version
The installation is done in your home directory and will persist across notebook restarts. To automatically load NVM in new terminals, the installation script adds the necessary configuration to your ~/.bashrc file.
How can I install additional software packages in my notebook?⚓︎
In Kubeflow notebooks, root access is disabled by design for security reasons. However, Homebrew provides a way to install additional software packages in your user space without requiring root privileges:
# 1. Download and install Homebrew in your home directory
export HOMEBREW_PREFIX="$HOME/.linuxbrew"
mkdir -p "$HOMEBREW_PREFIX"
curl -L https://github.com/Homebrew/brew/tarball/master | tar xz --strip 1 -C "$HOMEBREW_PREFIX"

# 2. Add Homebrew to your PATH
echo 'export HOMEBREW_PREFIX="$HOME/.linuxbrew"' >> ~/.bashrc
echo 'export HOMEBREW_CELLAR="$HOMEBREW_PREFIX/Cellar"' >> ~/.bashrc
echo 'export HOMEBREW_REPOSITORY="$HOMEBREW_PREFIX"' >> ~/.bashrc
echo 'export PATH="$HOMEBREW_PREFIX/bin:$HOMEBREW_PREFIX/sbin:$PATH"' >> ~/.bashrc
echo 'export MANPATH="$HOMEBREW_PREFIX/share/man:$MANPATH"' >> ~/.bashrc
echo 'export INFOPATH="$HOMEBREW_PREFIX/share/info:$INFOPATH"' >> ~/.bashrc

# 3. Update PATH for current session
export PATH="$HOMEBREW_PREFIX/bin:$HOMEBREW_PREFIX/sbin:$PATH"

# 4. Initial brew update
$HOMEBREW_PREFIX/bin/brew update --force
# Install cowsay
brew install cowsay

# Use cowsay
cowsay "prokube is awesome"
You can discover available packages with brew search and install various tools like jq, htop, neofetch, and many more. The Homebrew installation lives in your home directory and will persist across notebook restarts.
How can I install Starship prompt in my notebook?⚓︎
You can enhance your terminal with the Starship prompt, if you like it:
# 1. Create local bin directory
mkdir -p ~/.local/bin

# 2. Install Starship
curl -sS https://starship.rs/install.sh | sh -s -- --bin-dir ~/.local/bin

# 3. Add ~/.local/bin to PATH if it's not already there
export PATH="$HOME/.local/bin:$PATH"
echo 'export PATH="$HOME/.local/bin:$PATH"' >> ~/.bashrc

# 4. Add Starship initialization to your shell configuration
echo 'eval "$(starship init bash)"' >> ~/.bashrc

# 5. Apply the changes
source ~/.bashrc
Removing the container symbol from the prompt
The Starship prompt shows a container symbol because it detects that you're running inside a container. To remove this symbol:
# Create the Starship config directory
mkdir -p ~/.config

# Create a configuration file that disables the container module
cat > ~/.config/starship.toml << 'EOF'
[container]
disabled = true
EOF
~/.config/starship.toml file.
For more configuration options, visit the Starship configuration documentation.
I want my notebook to run on a specific node⚓︎
By default, notebooks are scheduled on any node in the cluster. You can restrict this by setting a node affinity, for example if you have different GPU types installed on the nodes. This needs to be setup once by a cluster admin, see the admin docs for notebooks for details.
After this is setup, you can select the node affinity when creating a new notebook:
- Open the new notebook dialog
- Click on "Advanced Options" at the bottom
- Select the desired node affinity from the "Affinity Config" dropdown